New website, new goals, and a sectional warping calculator
I have migrated to Squarespace. As of right now, that's still a work in progress. The old blog posts have to get fixed.
But! I have created a tool to aid in sectional warp division.
Check it out: the tool.
Of course, all the math involved is basic arithmetic. But a calculator makes the process simpler.
Here's the problem I'm solving for:
- You want to wind a sectional warp
- Your pattern/draft only specifies EPI and total warp ends, perhaps a color sequence as well
- You need to determine how many sections to use, how many ends per section, and what order to wind what colors in
This calculator takes into account a minimum section width (in inches), and attempts to evenly distribute extra threads across the warp.
For example, if we have a 220 end warp, with a color sequence of A 24, B 10, and C10, repeated five times, and an EPI of 16, and a section width of 2 inches, we can state:
Project EPI: 16 Total warp ends: 220 Project width in reed: 13.750 inches Project section width: 2 inches Minimum ends per section: 32 inches
And our sections would look like this:
Section 1 (37 ends):
A: 24
B: 10
C: 3
Section 2 (37 ends):
C: 7
A: 24
B: 6
Section 3 (36 ends):
B: 4
C: 10
A: 22
Section 4 (36 ends):
A: 2
B: 10
C: 10
A: 14
Section 5 (37 ends):
A: 10
B: 10
C: 10
A: 7
Section 6 (37 ends):
A: 17
B: 10
C: 10
There's currently very little error handling or helpful messages. If you put "0" in any of the fields, I am pretty sure the calculator will break.
Have you ever wanted to make bobbin lace?
I have! For a long time. There were a few things stopping me though.
Equipment, mostly. I could tell very many bobbins were needed, even more pins, and also a specialized foam pillow thing of some sort.
That plus the complete conceptual opacity of what compromised a pattern kept me from even trying it out for a very long time.
Last year, I finally bought myself a bobbin lace pillow, and decided the bobbins would come later. And how hard could a pattern really be?

Behold! Bobbins!
My local big box craft store had some colorful clothespins, which was nice to keep pairs of bobbins separated for my first project. I also picked up the smallest pins they had, which were these glass-head sewing pins. The thread is size ten crochet cotton I had on hand due to tatting.
And I had no idea how to pick a first pattern, but I got lucky and picked rose ground. "Lucky" in that it was a ground and not ground plus other things.
The instructions I followed were from howdidyoumakethis.

And it turned out well!
I started and ended improperly, but figured I would leave that for later. The clothespins were a little frustrating, as they didn't actually grab the yarn very well. And I could see that becoming an even larger problem with smaller thread.
Then I had to move apartments. So everything got packed up and a lot of things didn't get fully unpacked till much later. You know how it is.
Within the last month or so, I decided to take bobbin lace back up again.
I invested in actual bobbins, more appropriate pins, and just picked the first pattern I liked. Which was spider and line ground from Jo Edkins' website.

Many observers may notice the spiders look awful. Especially keen-eyed ones will note that every spider is done in whole stitch, instead of cloth stitch, so they were having a lot of trouble closing. Plus there are a few too many twists in the legs for my preference.
At this point, I was celebrating completion of a real pattern. I also learned that Jo Edkins' website is an incredible resource for people like me who want to throw themselves at a thing until it starts working. There are animations and clear explanations and great diagrams for everything I needed to know.
My learning process is very much "let's just see how far we can get", and "we'll learn what we don't know very quickly along the way". With fiber arts, this generally works well. There is of course a lot of tangled thread and unstable fabric created, but hands-on experience is incredibly valuable, and more fun for me than reading reference information.
With the confidence of an unseasoned beginner, I purchased a pattern for a mat (MyrtleAndEve on Etsy). Turning the corners was easy until the last segment, when I realized that my haphazard pin-pushing made it impossible to neatly flatten them into the cushion. So I learned that pins should be placed a little more neatly than I had been doing.

In the end, I was rewarded with a non-squared square.


Still unsure how to finish pieces, but it turned out pretty well! And using size 50 thread. The main thing I learned from this was "don't use a white pricking for white yarn".
I feel like a much more confident bobbin lace beginner now.
First (ish) roll from my new to me Kalimar SR200
A few weeks ago, I got a Helios 44 lens, which happened to be attached to a Kalimar SR200/Zenit E camera. The seller wasn't sure the camera worked, but mechanically, it seemed to function. The light meter even seemed to work!
The first roll I shot in the camera came out totally blank. Which was disappointing. I think the issue is the film holder is very fiddly, either from wear or age. But I'm happy to report that the second roll was totally fine! I got 32 photos, despite the back being opened once accidentally during rewinding...

These are the small-sized scans from my local photo lab. I think this is Fuji 200 film. I've tweaked the colors, crop, and alignment in capture one slightly. The photos with bugs in them have been cropped rather severely though (the Helios is not a macro lens, though it does have a fairly short minimum focus distance).
I took most of these images on a quick coastside stop back from a camera shop where I gave them the 135mm lens that also came with this camera. Like me, they assessed it as being worth no money, but were happy to take it and try to sell it for $5 or so to someone who might be in need of it. I'm hopeful it'll find its way to someone who will appreciate it and put it to good use. It was in very good shape, just a focal length that was already covered by three of my other lenses on various systems.
Anyway. These photos were all shot with the Helios 44. It was kind of fun shooting the camera with its kit lens. I didn't trust the light meter at this point, so these were all taken on a sunny day, at f16 and shutter speed 250, for my 200 ASA film.
These are kind of throwaway shots, because I didn't think the camera worked, and had just run another roll of film through it that came out blank. I think that first blank roll was user error, somehow. I'm still not sure what went wrong. In any case, I did get some images that I enjoy off of this second roll!
 |
| Cropped, straightened, and colors adjusted |
 |
| Cropped very much! Colors adjusted. |
 |
| Just fixed the alignment here. |
 |
| Three oil rigs in the distance... |
There's definitely something funky happening in most of these photos. I think most of the issues are due to the back being opened while film was being rewound. I had rewound more than half of the roll and I don't have much intuition for how long I should be rewinding, having only rewound five entire rolls of film before, this being the fifth.
The film spool popped up and offered no resistance when turned, and didn't seem to want to go back inside the camera, so I opened up the back. There was definitely film visible... So I'm hoping the optical defects and light leaks are a result of that, rather than something with the camera.
 |
| Cropped to be vertically oriented. I think this might be f11 or f8. |
 |
| Slightly changed some colors. |
 |
| Cropped, colors adjusted. The petals and the bee are very crisp here, this lens is sharp! |
 |
| An "artistic" light leak over the stop sign. Colors adjusted. |
 |
| Colors adjusted. Taken from the top of a parking garage. |
 |
| Cropped, colors adjusted. |
 |
| Pretty much "straight out of camera" -- light issues very apparent here. |
Maybe I'll keep that zoom lens after all...
I overlooked a couple things when testing that vintage telephoto lens from my last post.
1) The included extension tubes!
2) My micro four thirds camera!

The huge working distance for this lens and the 1:5 reproduction ratio was a disadvantage for me. Extension tubes address that, somewhat. I don't think I would use this lens as a telephoto -- if I use it, it'll be for macro. So the loss of infinity focus isn't an issue here.
And a micro four thirds camera "doubles" focal length of full-frame lenses. So the 80-200mm becomes a 160-400mm. That's pretty close to my Fujinon 100-400mm (which is more like 150-600 full frame equivalent on my crop sensor X-T4).
Here's the sandwich. Lens, extension tube, M42 to MFT adapter, Olympus camera:

I think this is still less weight than the X-T4's body. (Probably not).
Finding focus is much harder though. The very short distance that is in focus is difficult to find quickly, at least for me right now. I should probably make myself a chart for how the extension tube modifies minimum and maximum focus distances for 80 v 200mm.
This one is straight from the Olympus:

These next two have been cropped and slightly color corrected:


It was very windy and I was losing the light, so these are pretty much the only in focus and decent shots I got. But I see the potential of this lens now!
Helios 44-2: chasing the swirl
I got a new (to me) lens!

And a bonus film camera. (and two bonus vintage telephoto lenses!)
These Helios 44 lenses are fairly well known for having "swirly" or "twisted" bokeh. Fortunately, they were mass-produced and are easy to get a hold of for a reasonable price (kind of).
Notice how there's some weird circular effect going on with the tree? The in focus seagull isn't distorted, but the out of focus background is.

When researching this lens, I found articles and videos referencing this lens's cheap price -- $30-60 dollars! Unfortunately, even though those sources are relatively new (within the last five years), prices are not nearly that low anymore. Ebay listings show people are willing to pay $120-150 (or more!) for these lenses now.
Thanks to the hype surrounding the swirly bokeh, people have been buying these lenses and driving the price up. I am now contributing to the problem.
I have a relatively new copy of the lens (M42 mount, third plant), and
supposedly this generation of the Helios 44 has quality control issues.
But mine is in mint condition! No oil on the aperture blades, the
glass is clean and nearly dust free.
There are actually quite a few variants of this lens, as it was produced for decades in three different manufacturing plants. There are people more knowlegeable than me on this subject, so you can find other sources if you want to learn more. It seems like this was a fairly common kit lens on Zenit cameras. At least for the Zenit E. My Kalimar SR200 is actually just a Zenit E, with a new name on it for an American customer base.
I was not planning on purchasing a film camera. I was trying to find a good deal on a perhaps cosmetically flawed but optically functional Helios 44. It's pretty easy to adapt vintage lenses to a mirrorless system, and my favorite lens for my Fujifilm XT-4 is actually an old Nikon 90mm 1:2 macro lens.
There are pages and pages of Helios 44 lenses on Ebay. And on a whim, I added the word "tested" to my search. That pulled up a listing for a Kalimar SR200 film camera with three lenses, one of which was labeled as a 44mm lens. That lens was in fact the Helios 44, which is (confusingly) a 58mm f2.0 lens.
The seller had set the price for the camera and three lenses at just under $100. The photos looked good. So I purchased everything!
The other two lenses are both telephoto lenses -- one is a 135mm prime and the other is an 80-200mm zoom lens. I took them out this morning and wasn't super impressed by them on my Fujifilm XT-4.
Here's the 135mm telephoto, straight out of camera:

Minimum focus distance isn't bad! And it's pleasant to use. But it's got "character".

I think it needs a lens hood. Or it just has a lot of chromatic aberration naturally. Colors are okay, sharpness is fine for a vintage lens. Just not great performance wide open with harsh light (bird photo). Nothing special.
Here's the zoom. I was definitely trying out the "macro" ability, so most of these are at 200mm and minimum focus distance. I didn't notice that the macro was only 1:5, and minimum focus distance was something like 3 feet. So I'm not really sold on this lens being macro capable.

Some halation. The lens seems kind of soft, but in a pleasing way.

Really nice background separation! The background here is very nicely softened. Colors out of this lens were preferable to the 135mm prime. I think this tended to be sharper all around, but that's not really my priority with vintage lenses.
And here's a bonus shot of a bird very rudely flying off while I tried to get a photo.

I didn't have high hopes for the two other lenses that came with the Helios 44. And I don't think I'll keep either of them. I have a Fujinon 100-400mm lens, which is superior in every way to the 80-400mm zoom. I guess the vintage zoom is much smaller and slightly wider, but when I use the Fujinon, I want the 300-400mm range, the OIS, and the cleaner optics.
The 135mm prime just doesn't really fill a need for me. And I don't really like how the images looked out of the camera. I do very minimal editing, if any, so SOOC image quality is pretty important to me.
Now on to the lens I definitely will be keeping! Everything is SOOC again, no cropping, no exposure fixes, etc.

I think my lens likes to swirl at f2.8 and not really at f2.0.
Here the background is swirled, and the foreground just looks kind of mushy. The lens only swirls the background bokeh:

Very subtle -- I can only see the swirling at the very edges of this image:

Again, a subtle effect just at the edges:

Here's the lens stopped down to (I think) f8. My copy of this lens is really, really sharp stopped down. We get sharpness but no swirling at this aperture.

Same flower, with a more open aperture (f4?). Swirls are just starting to appear -- and we have a flying bug of some sort coming in for a landing!

Another example of how sharp this lens is when stopped down. The background is also pretty soft and blurry in a pleasing way, just not swirly:

So while I will be keeping this lens, I am not sure I'll use it only on my Fuji. I was planning on using it as a walkaround-ish lens for casual use plus some fun swirls, but there are two issues with that.
The first is the size of the lens on my camera.

The lens itself is not that large -- but the adapter almost doubles the length of the lens on my XT-4.
Secondly, the swirl effect is not as pronounced as it could be because I'm using a crop-sensor camera. Since the swirl is more extreme near the edge of the image, I'm "missing" some of the effect due to the crop sensor in my camera.
I'm not going to buy a full-frame camera just to get some swirly bokeh!
However, I do actually already own a full-frame camera. It's just analog. 35mm film is full frame!
The Kalimar SR200/Zenit E is a very sturdy camera. No batteries required. The light meter in mine seems to work, somehow. The shutter sound is deafening and powerful. The camera body is smaller than my XT-4 but somehow weighs just as much. It's got five entire shutter speeds, plus bulb mode. You'll need to convert ASA to ГОСТ to use the light meter. The self-timer on mine works too, and is even louder than the shutter.
Mine is the commemorative 1980s Olympics edition, which I find kind of funny. The US boycotted the Olympics that year for... reasons...
And yet this camera was rebranded into a Kalimar SR200 and sold in the US to an American. Just hilarious!

I shot a roll of cheap film to check the camera for light leaks, shutter issues (though it sounds fine), and to check if the light meter works or not. Hopefully I'll get the scans and negatives back soon! I'm very curious to see if this camera works.
In any case, I managed to get the lens I wanted for a fairly low price, and also a pretty cool film camera, regardless of its functionality.
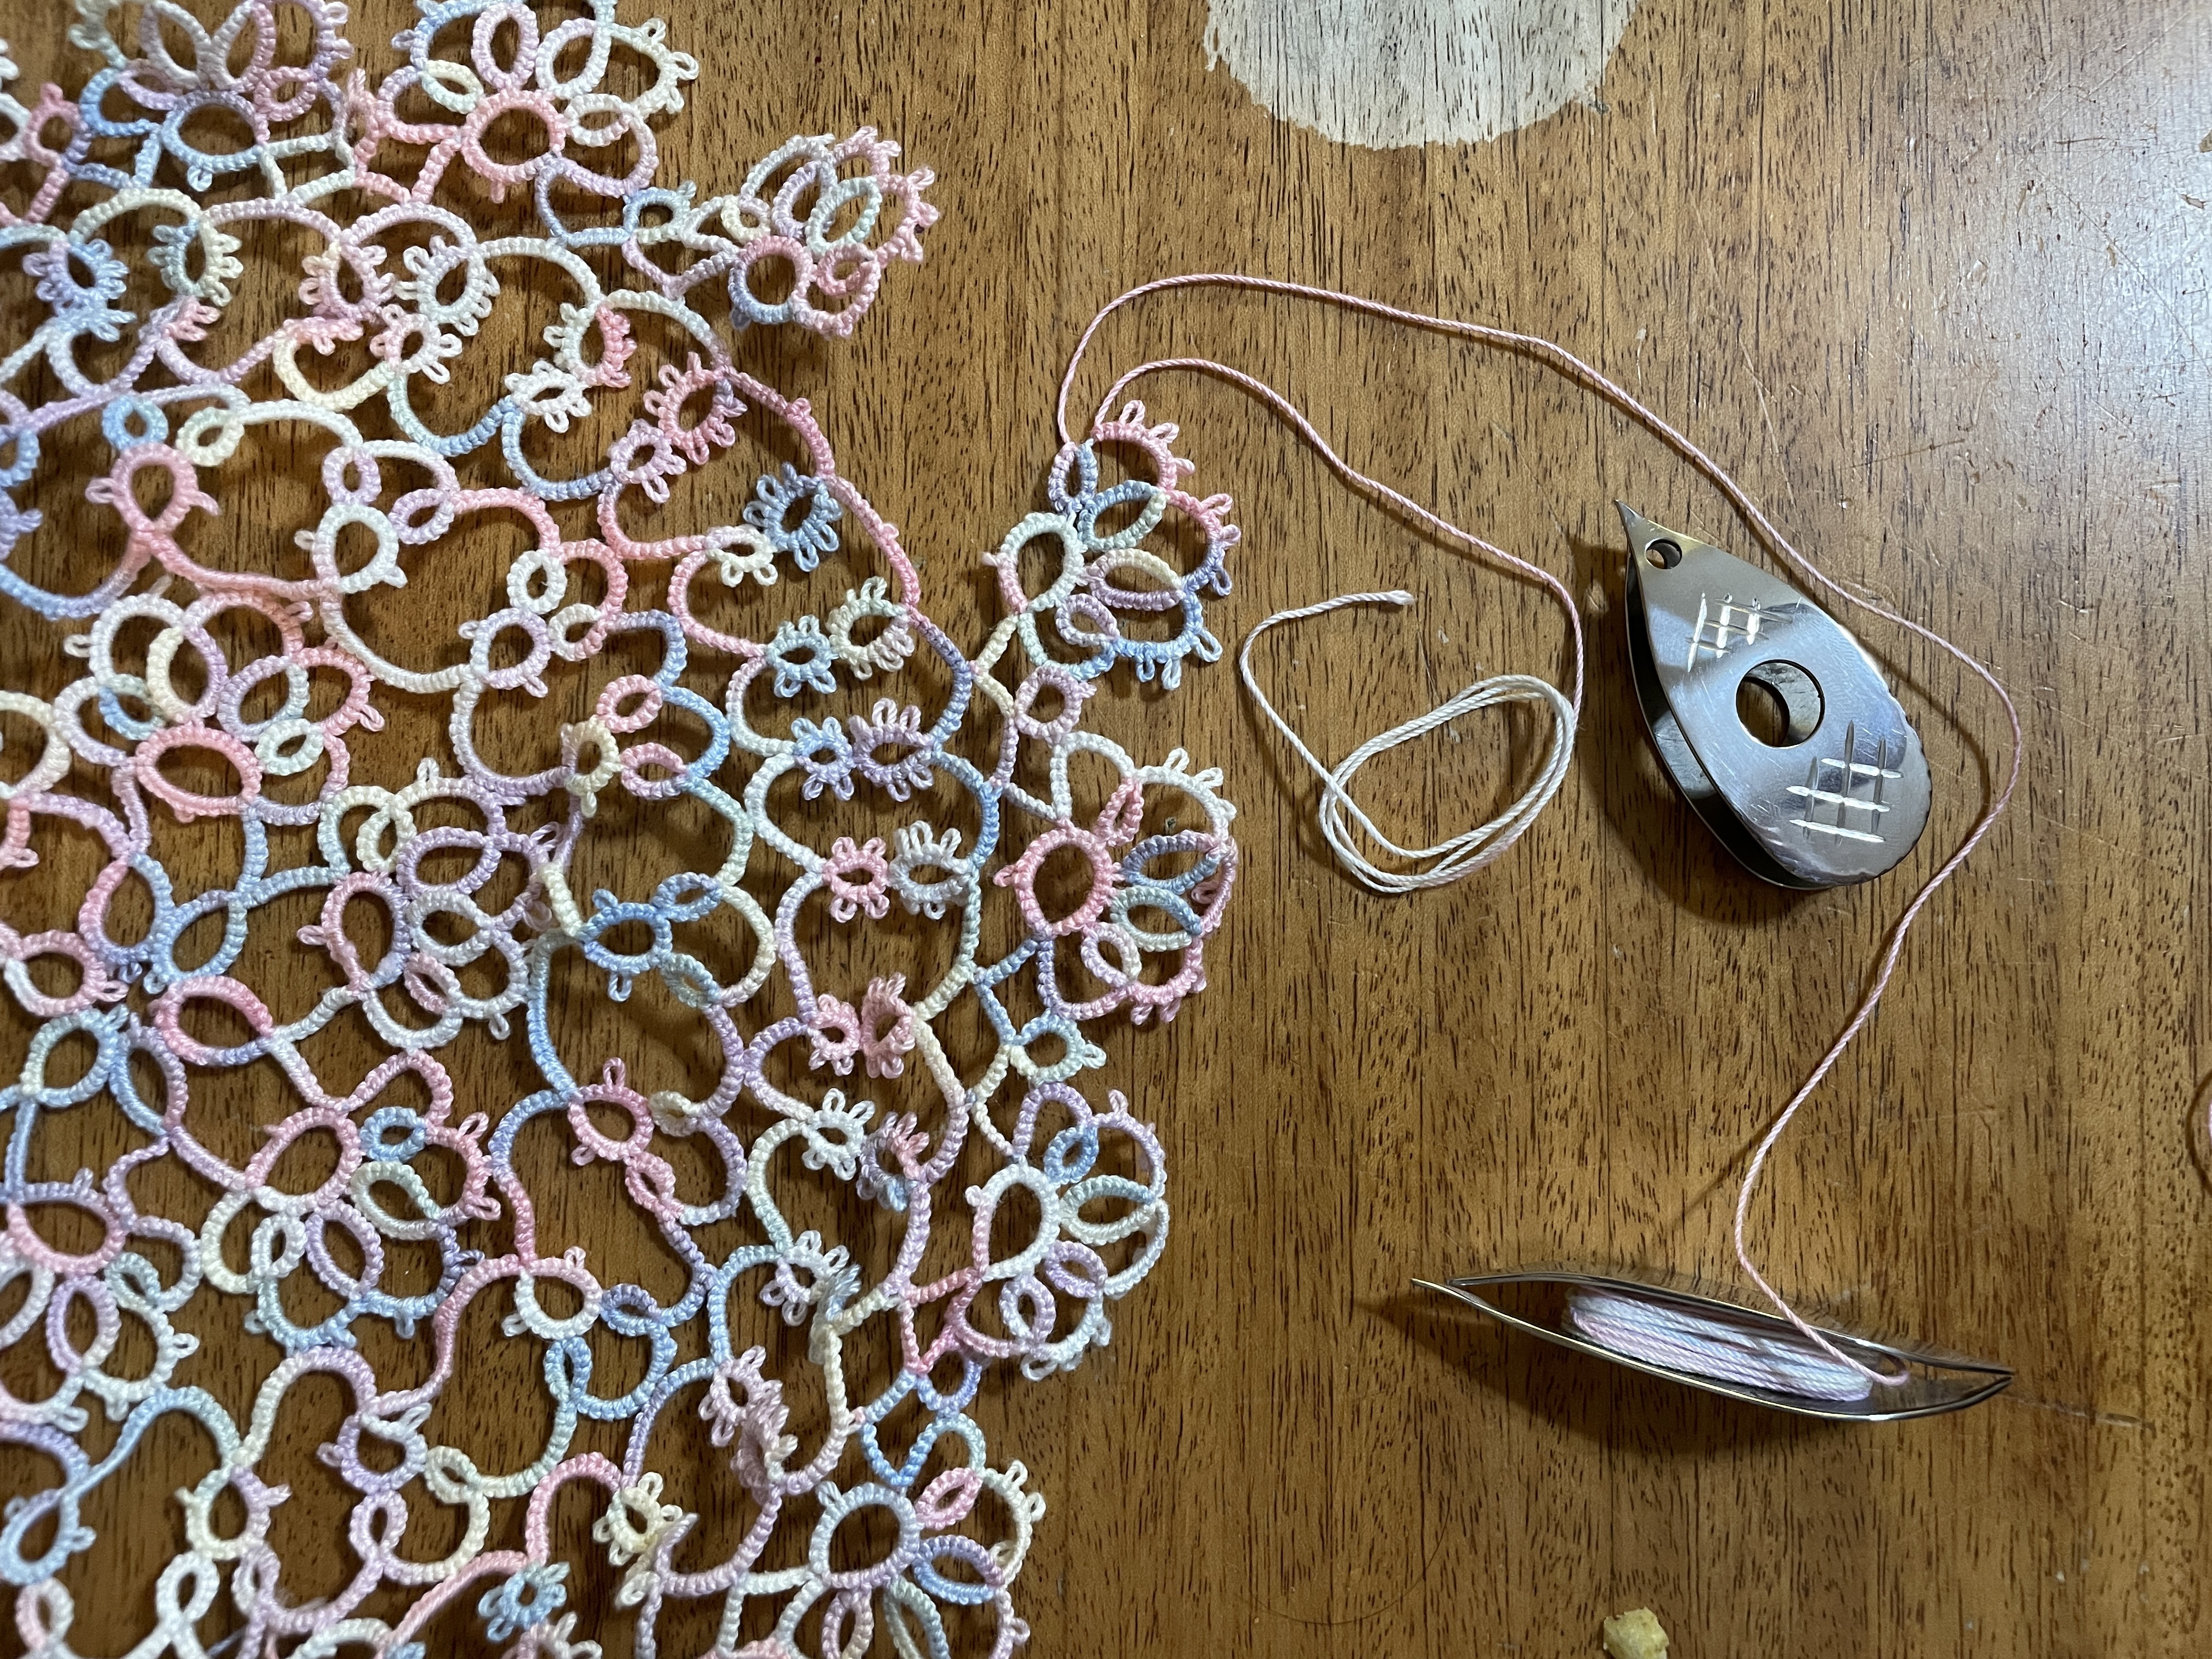
Renulek's Rose #3
Finished product first, of course.


Is now a good time to mention that I used 600 pins, and still missed about a hundred or so picots?

It took a very, very long time to get all the pins in. Thankfully, unpinning everything went much faster.
Progress photos below!
The first round completed:

The second round. The chains aren't as tight as they should be, and are flopping around too much. This will be a recurring theme, and definitely something I'll be paying attention to in future pieces.


You can see that the doily gets more and more wobbly as things progress. I think it would have laid more flat if I had been neater with my chains, ie pulled them a lot more tightly. The last round being so flat on its own actually helps the flatness of the overall doily.
I had a lot of fun with this doily. I actually started the same pattern, but in size 40 thread. I'm in the middle of the second round already, and am looking forward to the tatting! I will do a size comparison between this size 10 thread doily and the one I'm working on now, as I'm curious how much smaller the doily will be.
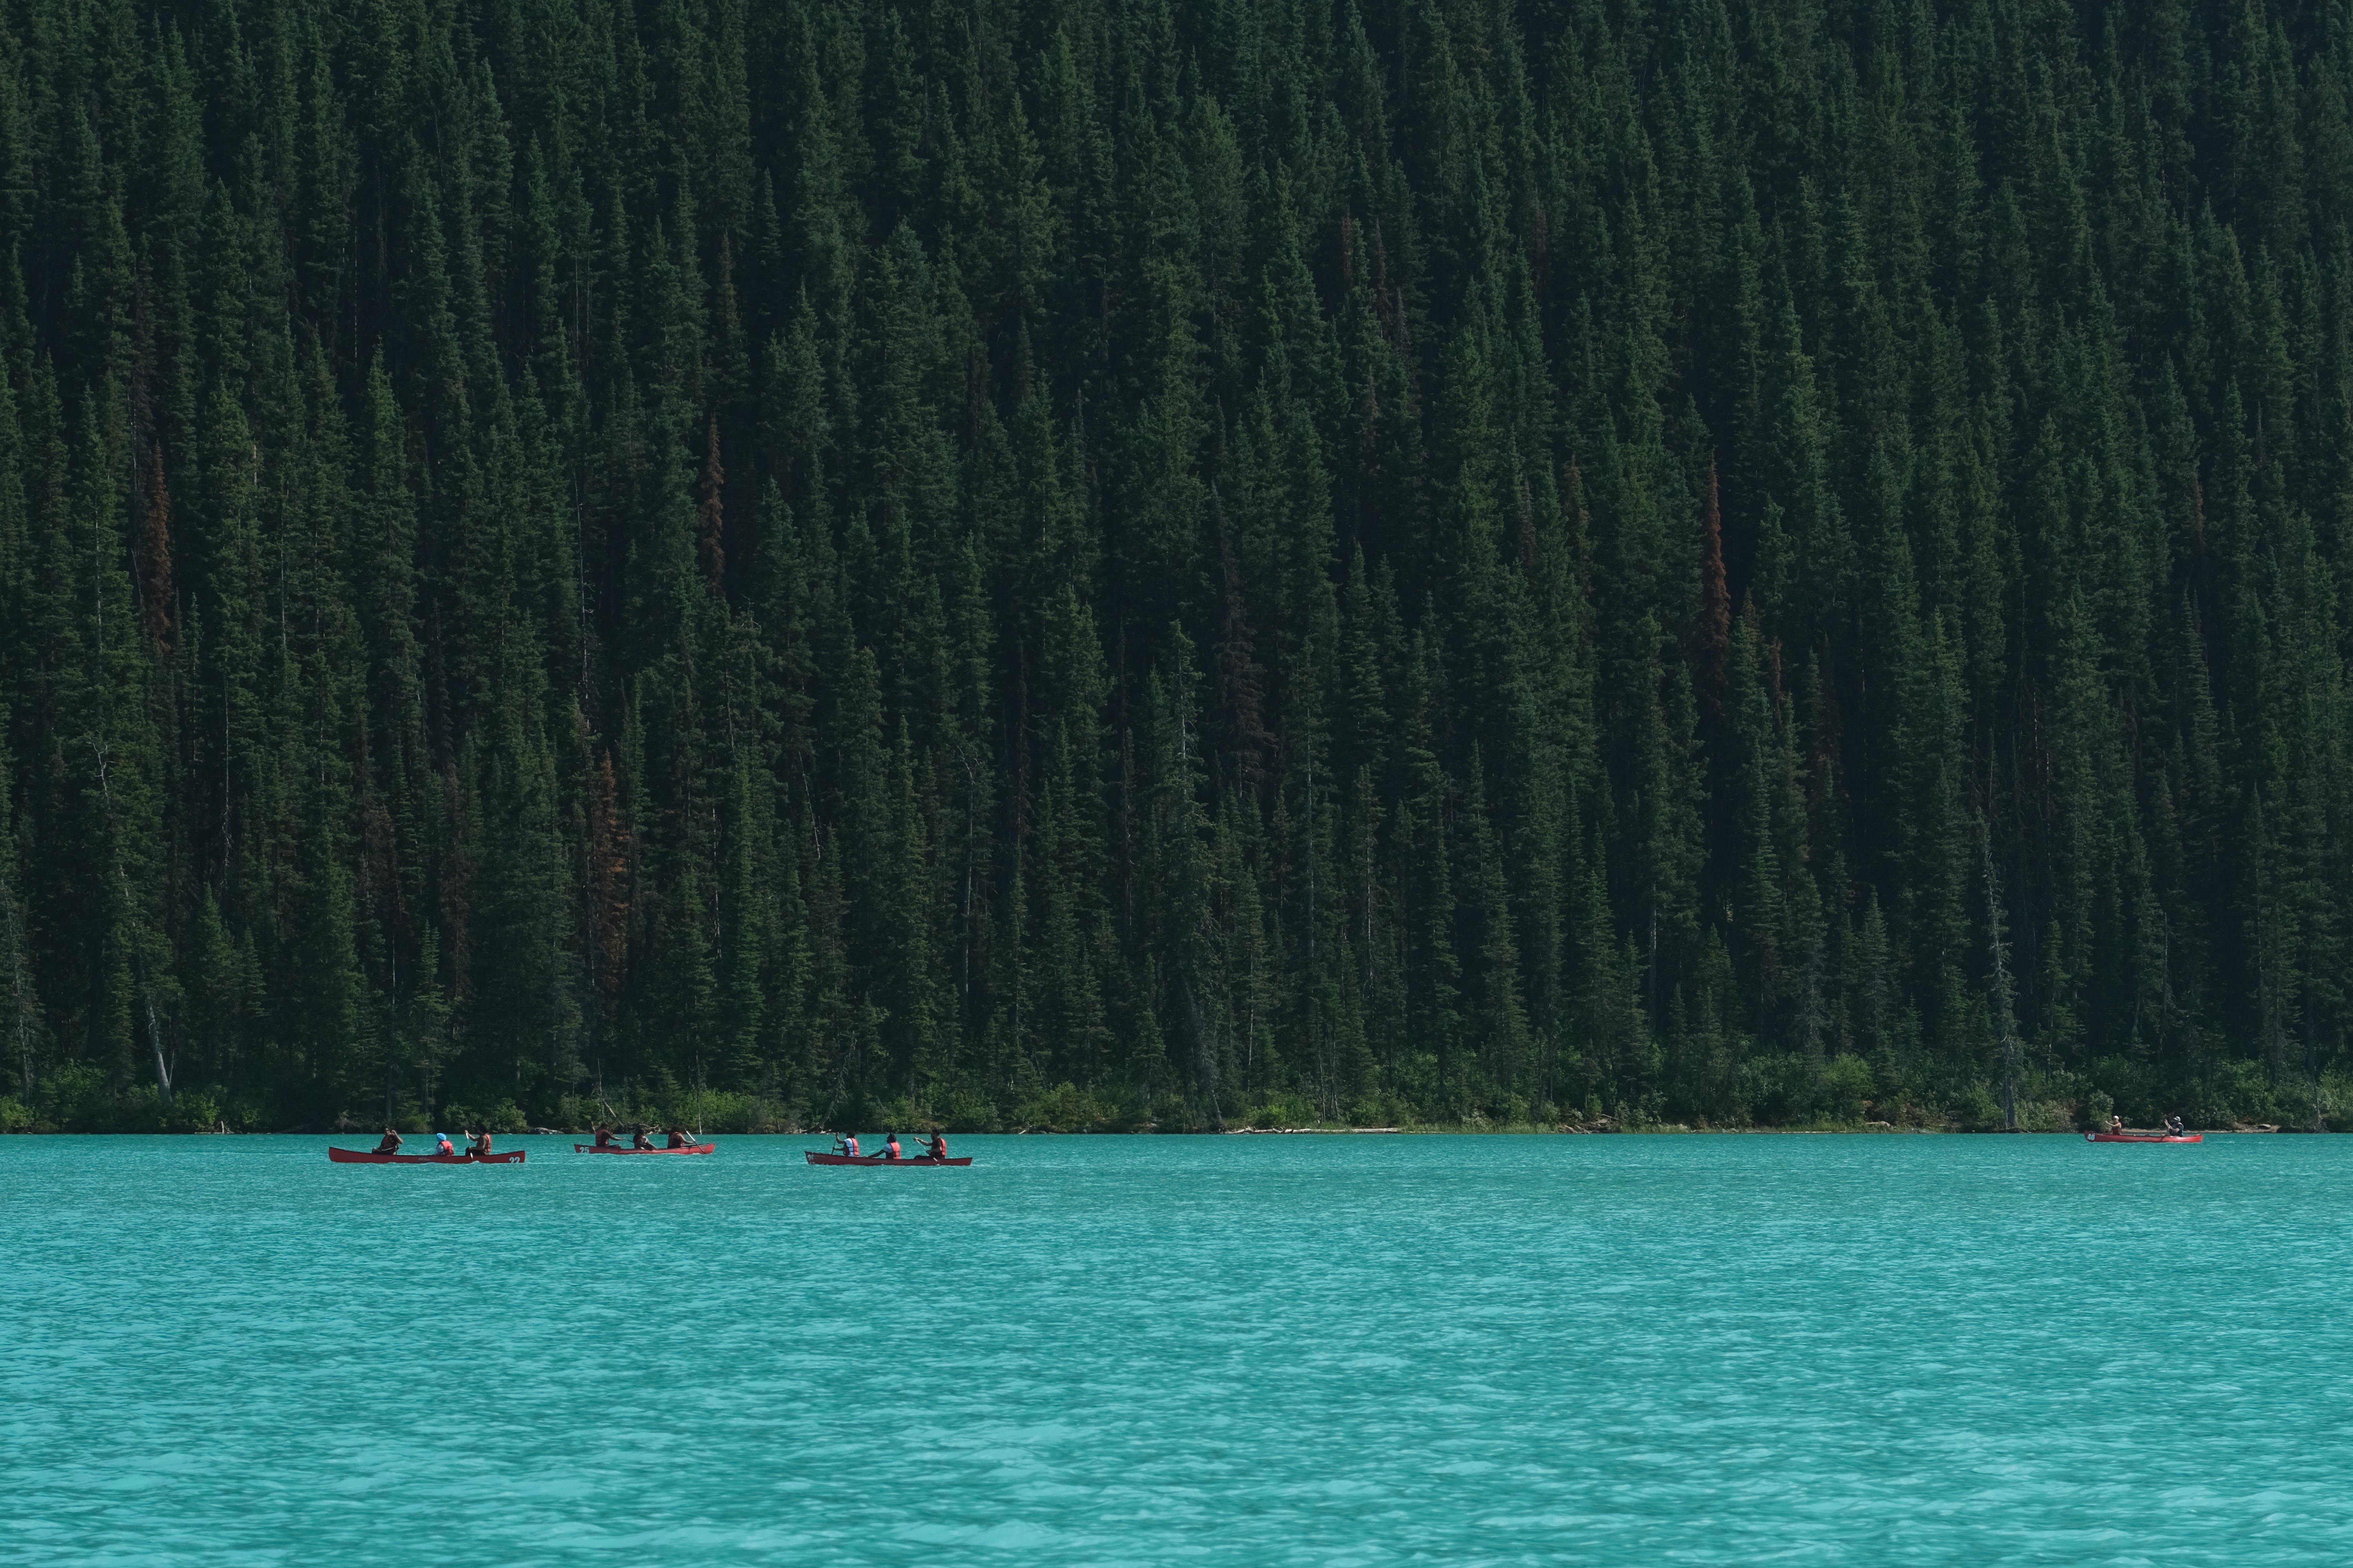
I went to Banff and took some photos
I took a lot of photos, actually. I have selected a few from the very, very many I took.
I think this is my favorite one.
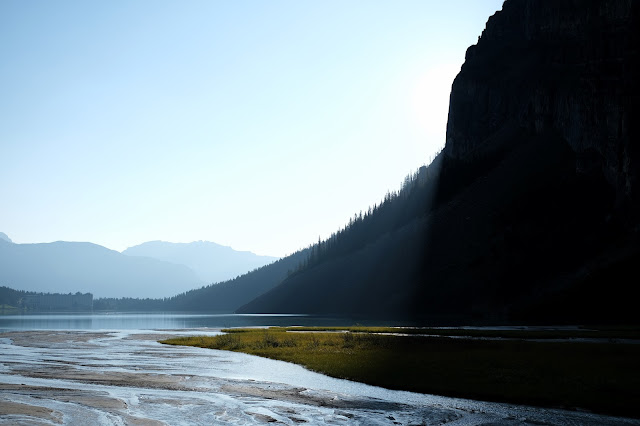

Very pretty, doesn't have the glacial lake color, but very pretty nonetheless. We didn't spend much time at this lake.


After we headed out of Lake Louise on the second day, we went to Lake Peyto. It's the same surreal color, but the viewpoint is from a very high elevation, not the lakeshore. I think this photo almost conveys the unreal scale this entire national park exists at.

Lake Peyto's glacier:


Going back down the mountain:


(It's right in the center, that light brown smudge).
Additional wildlife photos include these fighting squirrels (they were not sniffing each other with friendly interest -- immediately started knocking each other around after this shot):


The trip was very fun. Very tiring, but very fun. We ended up doing quite a lot in a short amount of time.
Tatting: take two
Last year (?) I picked up needle and shuttle tatting. I decided to stick with shuttle tatting for the long-term, but was having some issues with ergonomics and reading patterns and tension. Somehow, taking a break from tatting entirely has resolved those issues entirely.
Here's my first piece from after my break Solstice (scroll to the bottom for the free pattern) by Tatting by the Bay:

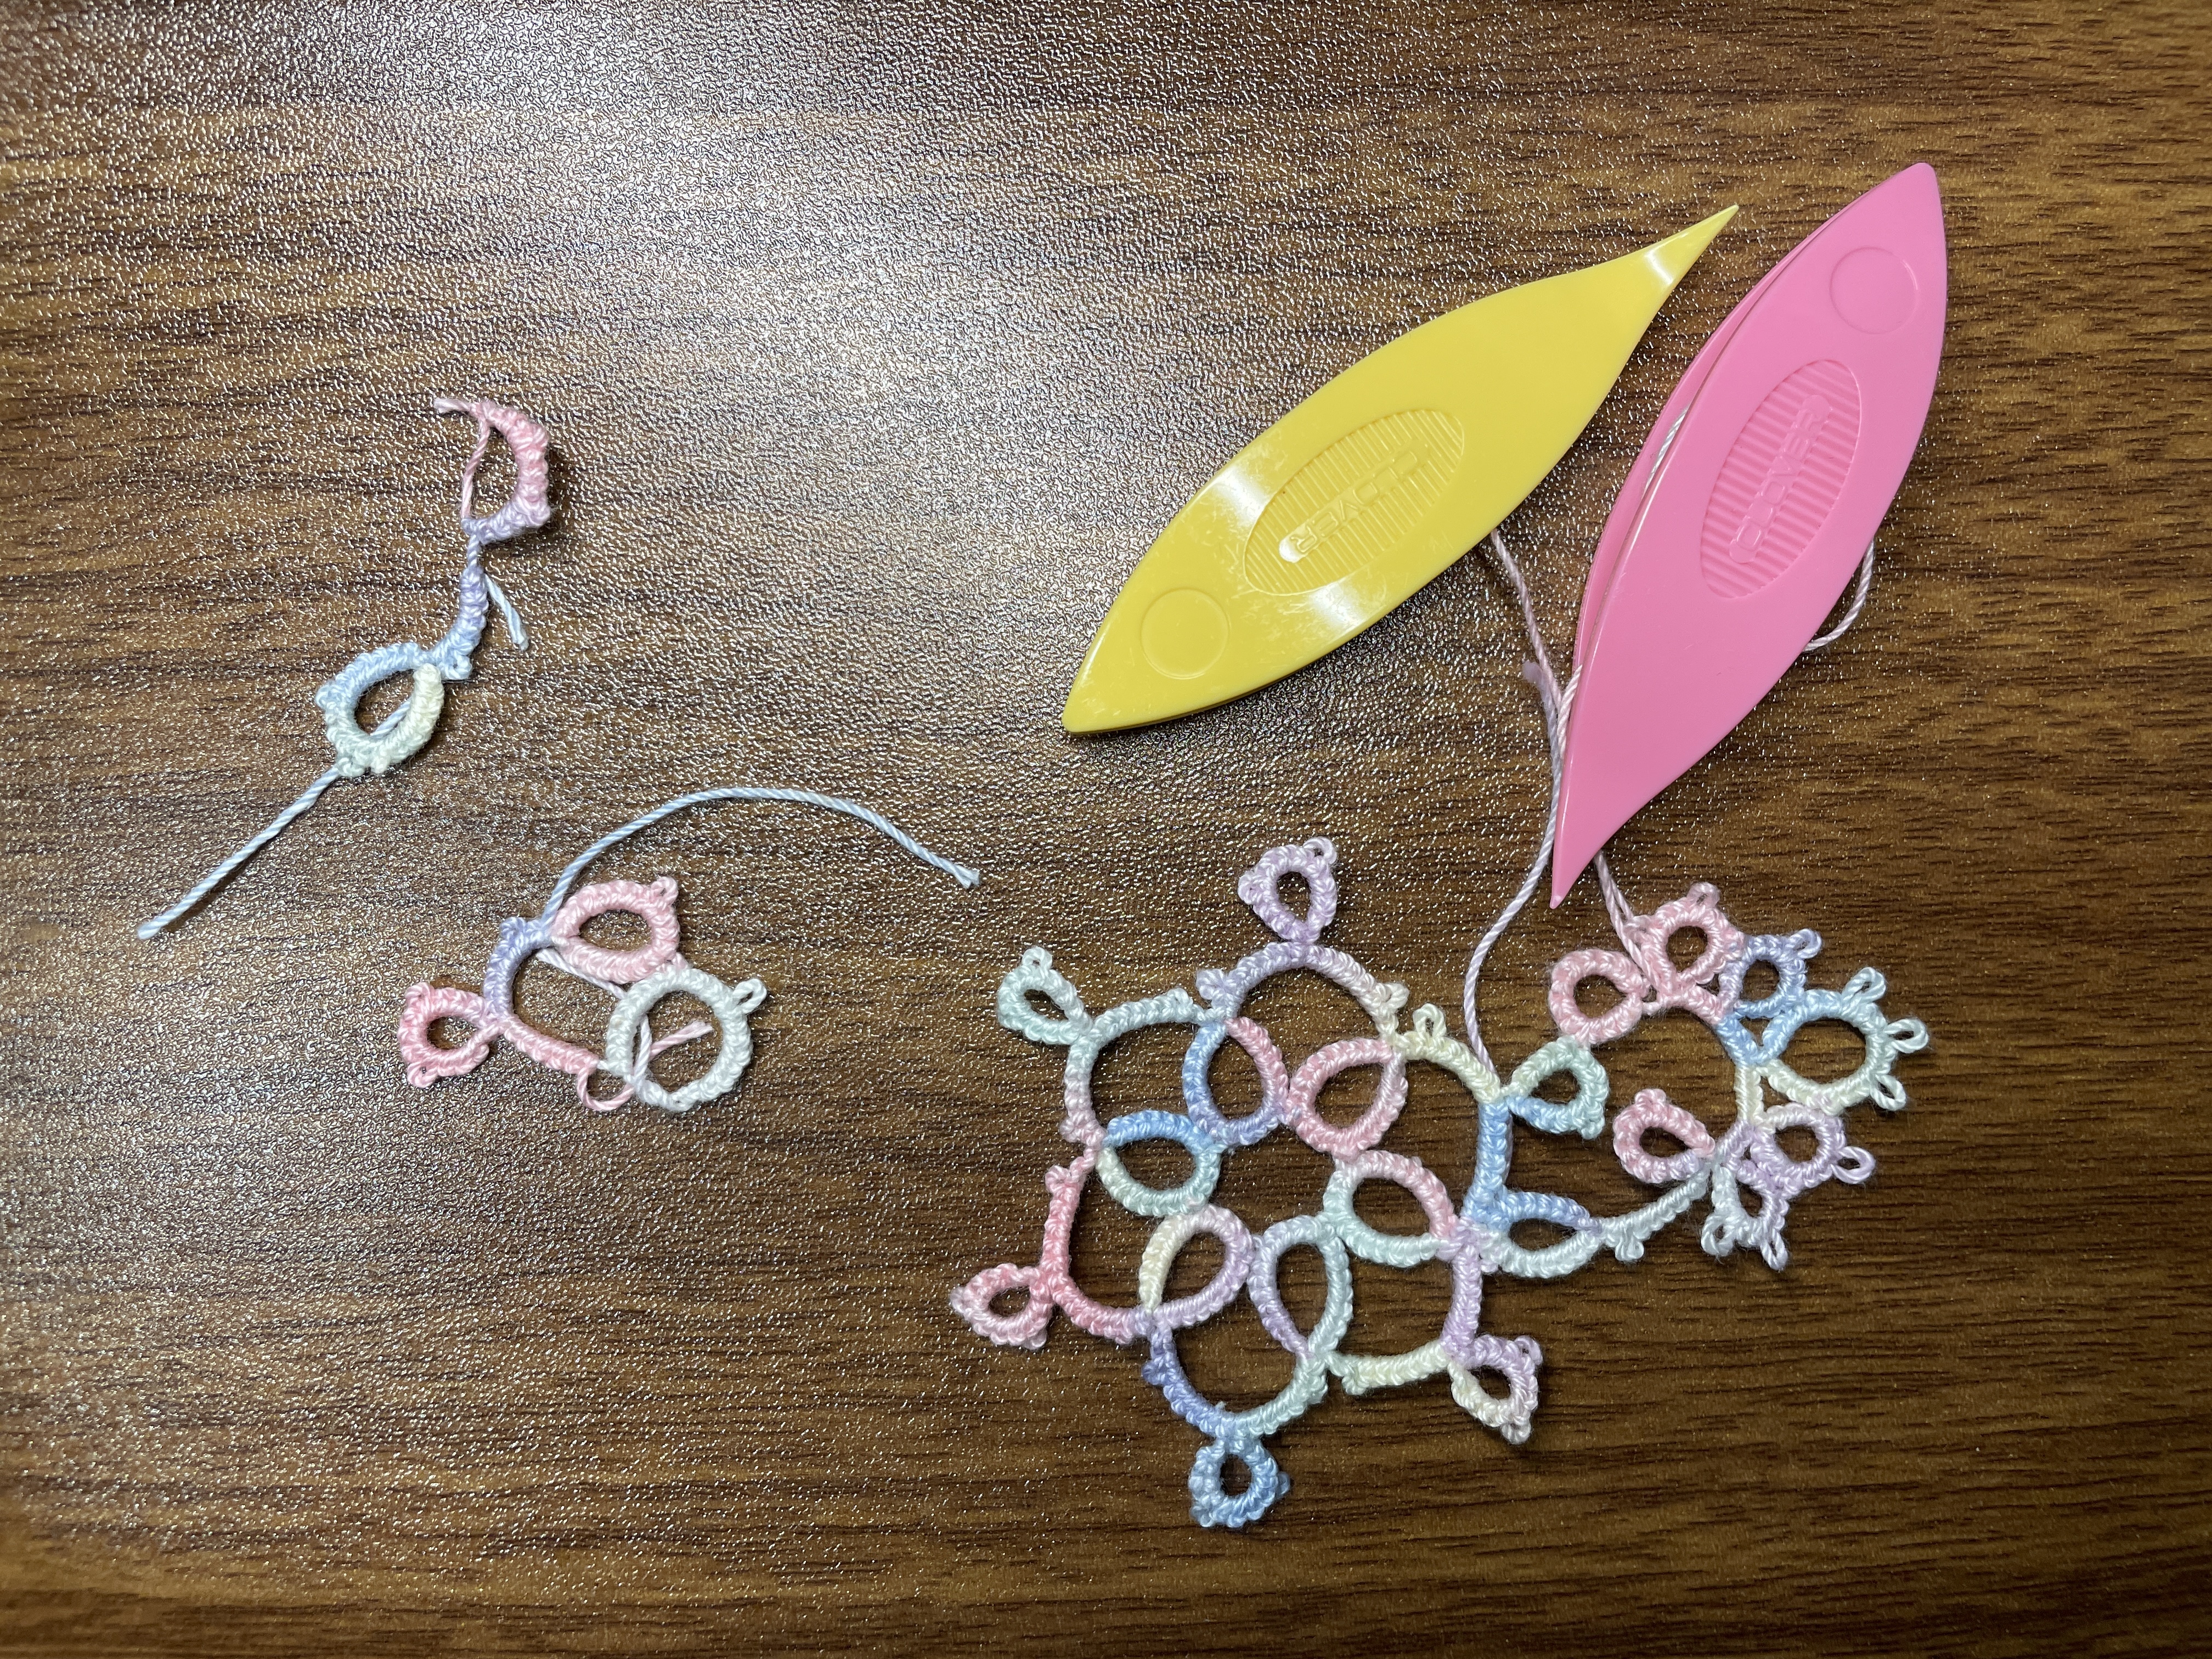
The far left is my first try -- don't recall what went wrong, but I think I didn't count something properly. Second attempt is definitely a counting issue. And the third, much larger one? That also has a mistake (a missing ring in the second round). Anyway. It worked eventually, as you can see from this post's first photo.

Encouraged by my success, I purchased a pattern for and started a much larger project. The first piece above is my first attempt, with what is considered normal tatting, where work is reversed for changes in stitch direction. I was also paying attention to front side/back side, and reversing the order of stitches when reversing the side of my work, all to try and make things look neater.
I was having some rippling issues, but was overall happy with how things were going. Till I tried unflipped chains.
The second, lower piece of tatting in the above photo features my new favorite technique -- unflipped chains. The piece lies flatter and is more even all around, plus it took far less time for me to tat it.
Here's the first round of that doily:

And the almost-finished third round:

I'm finding this relaxing and enjoyable! I also really like this rainbow-y pastel yarn. Multicolored yarns get a bad rap for tatting, but I find myself admiring how this one looks quite often.
Unflipped/non-flipped chains are the best!
I recently switched to only doing unflipped chains when I tat. This is not my idea -- I got it from this YouTube video by Sparrow Spite.
There are going to be quite a few words in this post. Enjoy!
Why would we want to not flip our chains? Seems kinda weird.
Unflipped chains basically mean you stay on the front side of the tatting the entire time you're tatting (unless you're working a two-shuttle pattern).
And you can tat faster. Unflipped chains mean you don't have to reverse work nearly as often, or adjust the thread coming off the shuttle as often when switching from rings to chains or back, since you're reversing the shuttle that is used for the stitch thread.
Reversing work for me is kind of confusing, and I usually end up doing it properly, but I still sometimes twist something around, or mess up the curvature of a stitch. Tatting diagrams are top-down, and rotating them in my mind to line up with the upside-down tatted piece in my hand can be a lot!
I've also been trying to pay attention to the front side and back side of my work. So I'm attempting to nest chains properly and place picots between the right halves of stitches, all according to if I'm working on the front or back of the piece.
It's just a lot to track and execute neatly and quickly. And unflipped chains make tatting logistically and cognitively easier for me.
If you are intimately familiar with tatting, here's a link to the conclusion without all the in-depth explanation. You could also just watch the section of the YouTube video linked above.
Tatting stitches have directions -- top versus bottom.
Stitches will always curve, because of their structure.

The bottom of each stitch has two legs, and those grab on to the core thread (orange). The top half of the stitch is the cap that the legs go through, and how the stitch thread progresses to form new stitches. The top half of stitches always faces outwards, as the top half is wider than the bottom.
This is important because sometimes after completing a chain or ring, you will have to reverse your work in order to create the next chain or ring in the right orientation with the right curvature.

In the above diagram, we start with ring 1. We reverse work for chain 2. Reverse work again for ring 3. Reverse work for chain 4.
But we do not reverse work for ring 5, or again for chain 6.
And then we reverse work for ring 7.
The lighter purple indicates the top of the stitches (or the outside curve), and we have to pay attention to that as we follow this diagram. If we reverse work, or do not reverse work, at the wrong time, our chains will curve the wrong direction, or our rings will be on the wrong side of the chain.
The second item in play is flipping versus
not flipping stitches. Traditionally, every stitch is flipped (except
in the case of split rings or split chains).
To make a half stitch, you first make a half hitch with the shuttle/core thread (yellow):


There are two types of half stitches -- the first half, and the second half. Together they form a full stitch. The tops of the stitches are on the left of the core thread, and each full stitch has two "legs".
Here are two full stitches in orange, on the front side of the work. First half, second half; first half, second half. They're farther apart than they should be, to demonstrate that they're just loops on a core thread.

But what if we didn't flip our stitches?

This is the same order of half stitches -- first, then second, just unflipped. You will notice it looks very different.
Other than the stitches being in yellow (shuttle thread). the tops of the stitches now are to the right of the core
thread, and though there are four stitch legs, there is only one visible
top stitch. It looks like a loop, a full stitch, then a loop.
What
happened? Well, we didn't flip our stitches, so the loops are
effectively reversed. And it therefore looks like we're on the wrong
side of our work.
If we do not flip our stitches, and also reverse the order of half stitches (and do not reverse
our work), we get stitches that look similar to flipped stitches, but
on the other side of the core thread. Two wrongs make a right, kind
of.

See? Two full stitches, each with two legs, and one top. We just had to do the stitch halves out of order.
A side-by-side comparison, with stitch halves numbered:

Can we go from ring 1 to ring 2 without flipping our work?
If we flip our stitches as usual for the ring, do not reverse work, and go straight into the chain, we would end up with something that looks like ring 5 and chain 6, ie the curvature of the chain would be backward relative to the ring.
A natural consequence for not reversing our work.
However, we now know that not flipping our stitches can be used to create stitches that look like the right side of our work, with the opposite orientation to the core thread!
A modified version of the original diagram:

We start at the same place. Blue numbers indicate flipped stitches. Orange indicate unflipped stitches (that 5 should be a 6, oops).
We do not have to reverse work until we finish chain 4 and start ring 5, and one more time between ring 5 and chain 5.
For this particular diagram, that means we halved the number of times we have to flip our work!
And this is a two-shuttle diagram (rings on both sides of the chain). For one-shuttle or shuttle/ball diagrams, using unflipped chains means you never have to reverse work. Which is awesome!
That concludes this post. It seems weird, but unflipped chains have made my life easier. Try it out on a small motif and see if you like it as much as I do.
Shooting on film (but, why?)
Long story short, film YouTube convinced me to try shooting film. People were having fun, talked about how different the experience was versus shooting digitally, etc. I was also really enjoying my instant photo printer (which I wrote about here), which kind of adds an old-school aesthetic to prints. I did some basic research and found that buying a used film camera off eBay wouldn't actually be too expensive. So I got one! The first roll revealed the camera had some pretty significant light leaks:

Even though it's unusable as an image, there's still something about the look that a digital camera and lots of post-processing would struggle to replicate.
And I "get" film now.
I get why people are still shooting film, even if it costs nearly $30 for 36 photos (cost of film, development, and scanning). The experience and result is so fundamentally different.
I think I've used disposable cameras before, so technically I'm not totally new to film. Those can still be bought new today. But I don't think anyone's making new film cameras (other than instant cameras, and a newly-announced/not-yet-released camera by Pentax/Ricoch).
If you don't have a camera, you have to buy one online or in a thrift store, etc. I opted for the online route, as none of my local stores had anything suitable (I found some massive vintage zooms lenses, but no camera bodies).
Since I already have a Fujifilm XT-4, I thought I would get a Fujifilm analog camera, so I could use my same lenses. And as the new Fujifilm cameras use the X mount, and the old Fujica cameras also use a lens mounting system called the X mount, I figured I could just buy a camera body and use a lens I already have.
I also wanted a fully-mechanical camera body, and with some very basic research, decided on the STX-2. I saw that the AX-3 was a fairly comparable option, being mostly mechanical, but found an STX-2 body for a very good price, and fully functional. So I ordered it!
And then I found that the X mount for modern digital cameras is actually not the same as the X mount for older Fujifilm cameras. Terrible naming conventions.
I went back to eBay and started looking for lenses that would be compatible with the camera. I found a new-in-box 28mm f2.8 Toyo Optics lens, which was a very cool find. A long-standing camera store was going out of business, and liquidated their entire stock online. They had a few other very old, very random bits and ends.

Think the warranty is still good?
I also found an AX-3 being sold "as-is". But it had the 50mm lens I was trying to find, so I bought the whole thing, just for the lens. That turned out to be a very, very good thing.
The STX-2 body that I ordered never showed up. The tracking did not update, and the seller ended up refunding me. I think it got lost in the mail. Still hasn't shown up.
The AX-3 was a bit dinged up, but fully operational. Other than the pretty bad light leaks. I got a light seal foam kit and replaced the ancient, disintegrating foam, which hopefully fixed the issue. I haven't gotten the test film back yet to see.
So in the end, I have a single AX-3, plus a 28mm and a 50mm lens. I think that's a fully functional film camera collection for my needs. I hope I never get interested in medium or large format or any of the other film-related things that cost the big bucks.


Another image from that first roll. Light leak is very apparent, again!
The rest of the photos are about the same. Light leak, random subjects, missed focus about half the time.
Shooting the roll was very fun though. Even though I wasn't sure the camera was working (I could hear the shutter and it appeared the film was winding properly), I found myself taking a lot of time composing shots, considering shutter speed and aperture...
Considering each shutter press was about a dollar, compared to my near-free shutter presses on my XT-4, of course I was going to take my time!
I only got 10 actual images from this first roll, actually. Half the roll was totally burnt out, probably due to the light leak. So, 10 pictures for $30 is more like $3 per photo, which will add up quickly.
Even so, I enjoyed the experience, and have since shot three more rolls of film. Hopefully the light leak is fixed, hopefully the focus is right, hopefully I get some nice images.
Privacy policy
I don't collect any information about you when you visit. However, third-party advertisers may utilize cookies. You can change those settings here: https://myadcenter.google.com/?sasb=true
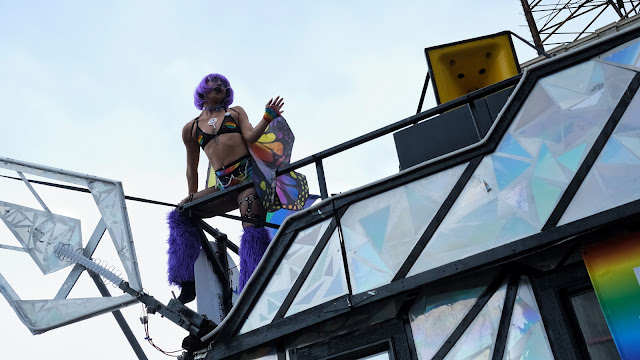
LA Pride Parade 2023
The LA pride parade seems like it might be a new tradition for me. Last year, I found myself in northern Los Angeles right before the parade started, and was free the rest of the day. So at the last minute, I decided to go. I found myself wanting a real camera (not just my phone) and a bottle of water and sunscreen. But I enjoyed myself thoroughly anyway.
This year I was slightly better prepared. Brought two cameras to overcompensate for a lack of camera last year, and a bottle of water. I skipped the sunscreen though. It was fairly overcast, so I was not punished for my blatant disrespect of our nearest star.

I love this parade. Everyone is happy and enthusiastic and friendly. There's a particular energy and sense of community that I haven't felt at this scale, except here. It is kind of funny seeing large corporations with floats (TikTok, Amazon, Blizzard...) represented, but it's still nice to see that more and more companies are pushing for inclusion and awareness. Even if the majority of their efforts are concentrated toward a single month of the year. It could be better, but it could be far worse.
I took a lot of pictures, and even some videos. Most of the photos are just okay. The autofocus on my camera was necessary to get focus on the moving subjects, but kept locking on to parade watchers in front of me waving flags, which makes sense. Or someone in the background, which is also pretty reasonable, I guess.
I would have loved for this photo to have been focused on the signholder rather than the flag (and I swear it was when I pressed the shutter!), but it's still kind of fun, even though the focus is totally wrong.

I am still getting used to the focus system on my camera (Fujifilm XT-4), plus the new lens (a Fujifilm 27mm f2.8! The pancake!) was another relatively unknown quantity. My most-used lens is a 90mm manual focus lens that I'm very comfortable with now, but it means I simply haven't used the autofocus in my camera much. The best way to learn is to do. And I did get more comfortable with the autofocus system.
Oh, that second camera I mentioned? That's a film camera! A Fujica AX-3, to be exact. I got the camera and lens off ebay very recently.
The film has been dropped off at my local shop, and they estimate two weeks before they deliver the scans. They're pretty swamped at the moment. So, more photos to come (hopefully).
This year there was an emphasis on trans rights. I don't recall as much at the last parade. I assume it's because transgender healthcare and the rights of transgender people are being eroded and actively legislated against in many parts of the US right now.
It was nice to see the support, but it was also a sobering reminder of the grim reality some people must face.

I took a lot of photos of the parade. So many people, so many colors.

This kid was definitely chewing on that flag.


 | |||||


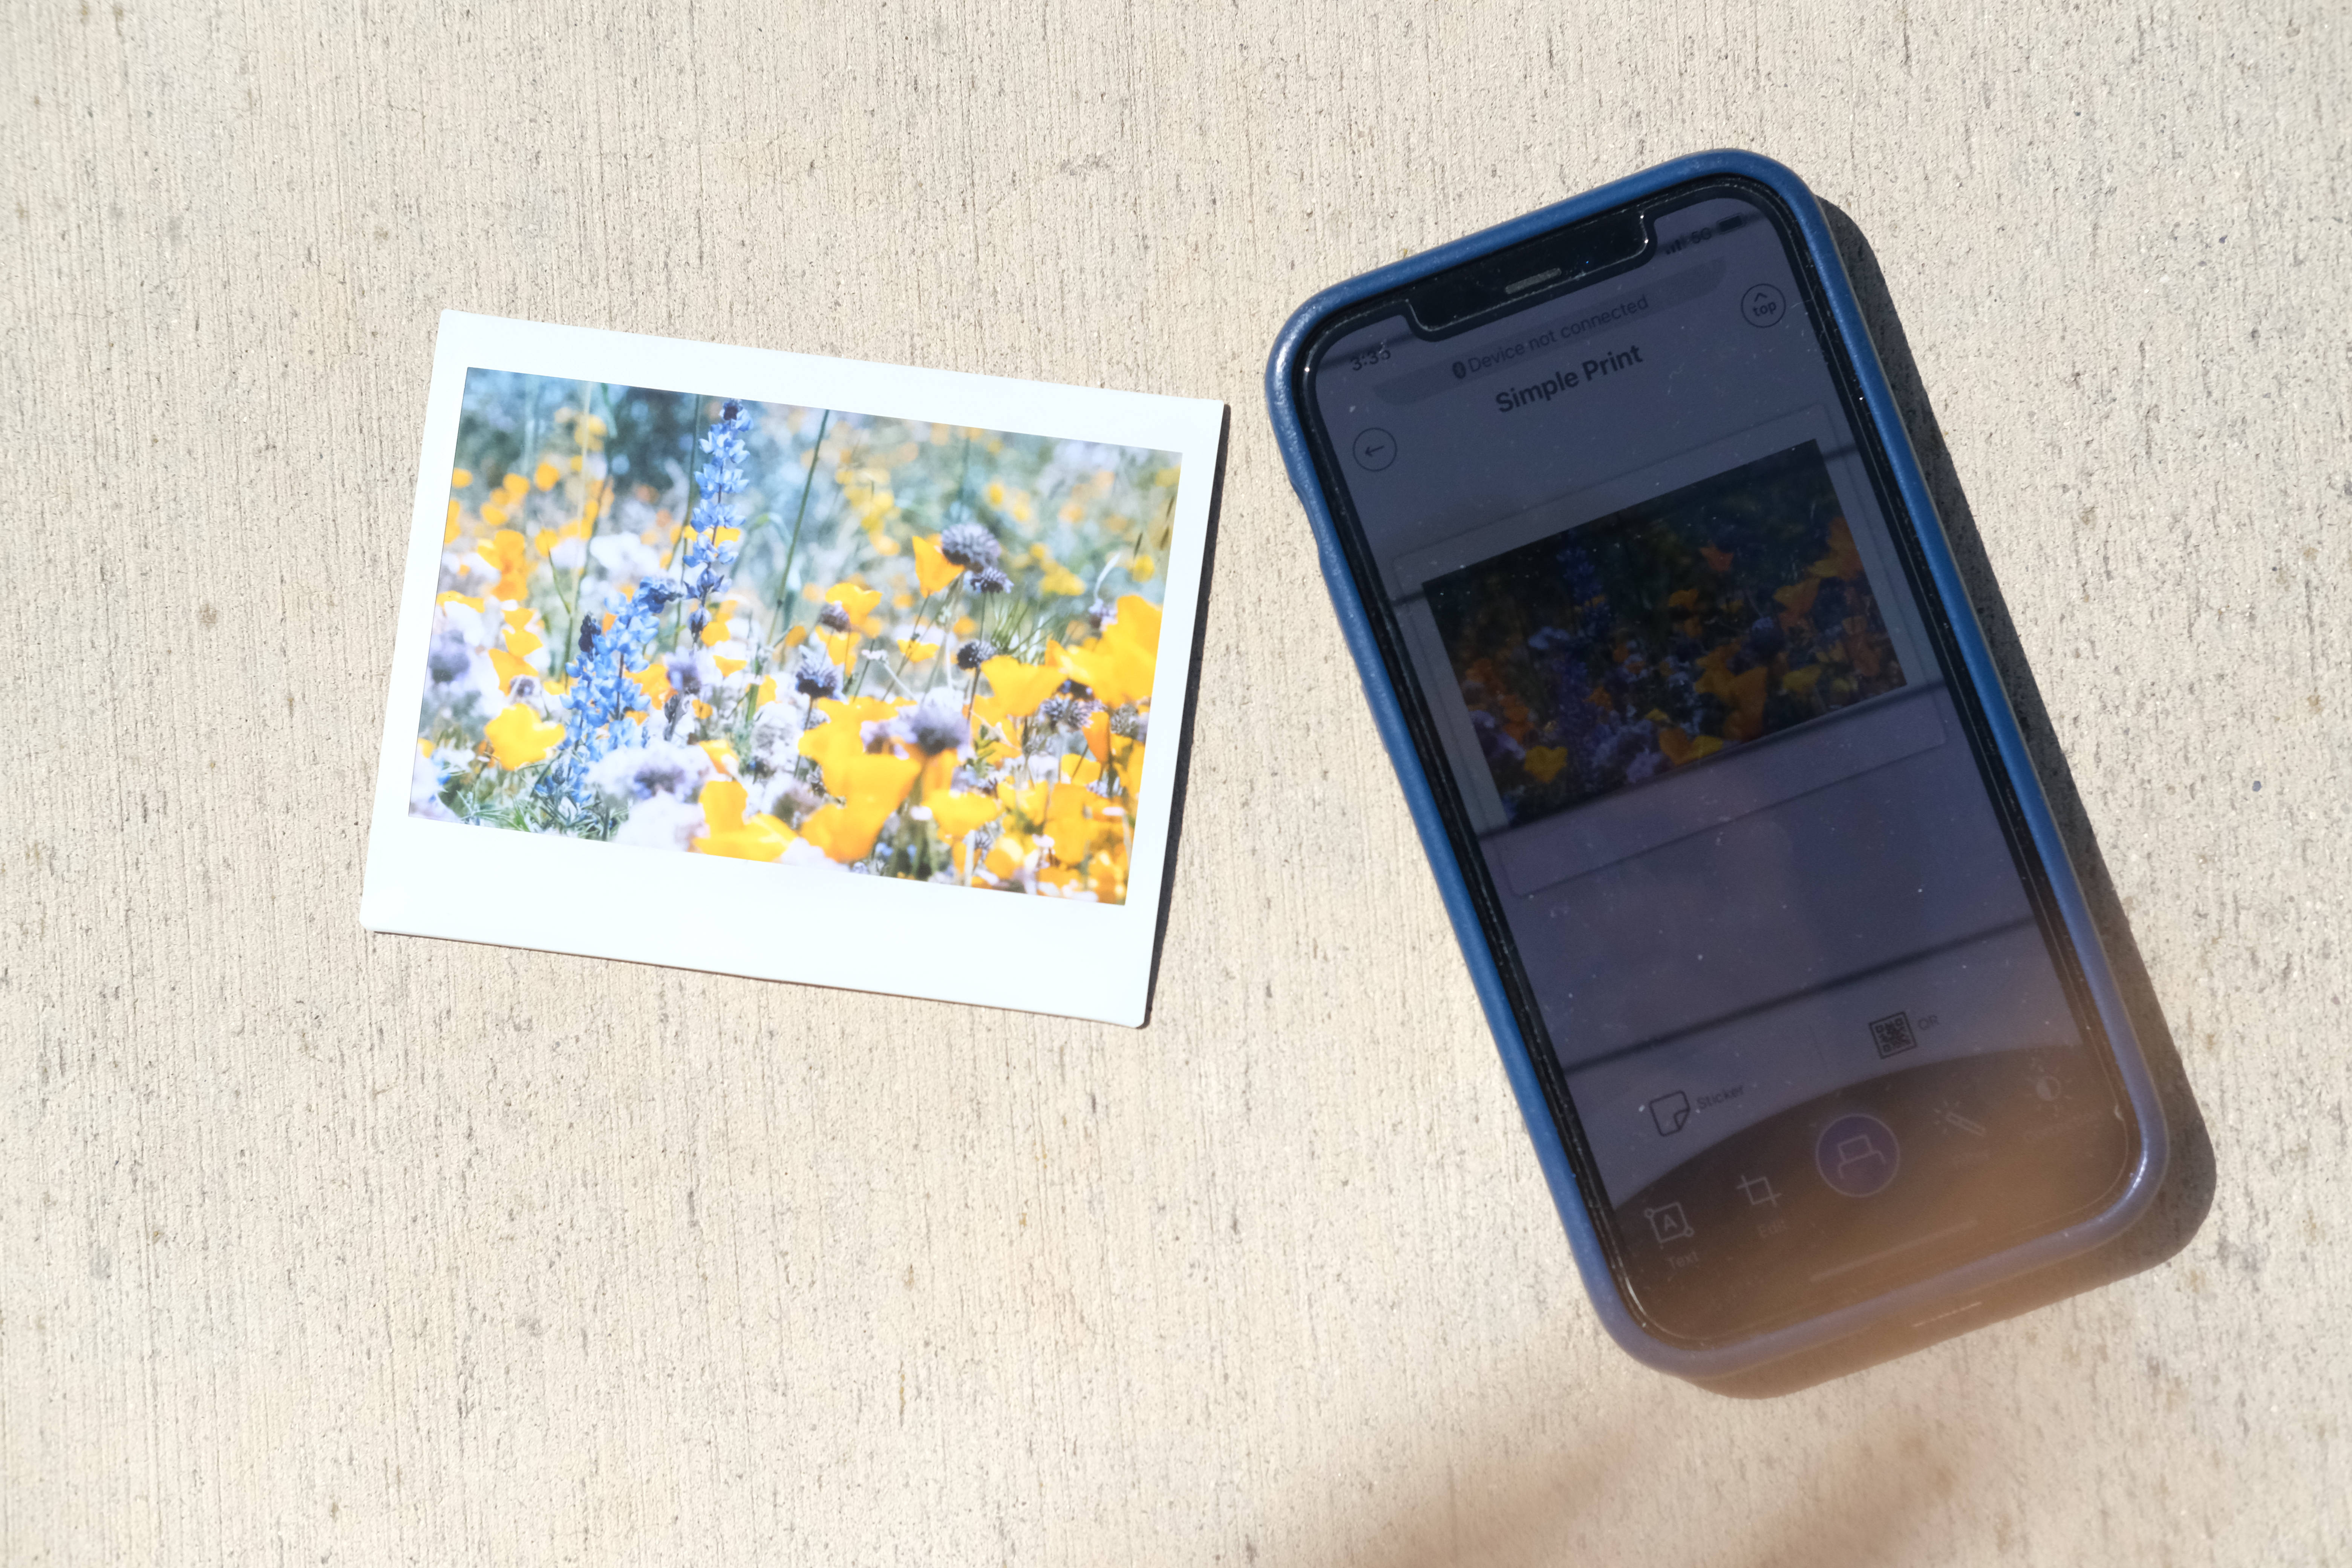
Printing photos with the Fujifilm Instax Link Wide
There's something beautiful about the experience of having a physical photograph. I take a lot of pictures. I've only printed a few. I can't quite say why. It's probably something to do with the whole process of selecting photos, submitting them online, having to wait to pick them up or get them shipped to me. I need some instant gratification!
On a related note, I've wanted an instant camera for a while. I think the draw of having a physical print immediately after pressing the shutter (okay, not immediately, but within minutes) is a compelling reason to purchase one. But I could never justify the purchase. I don't feel confident in producing quality images with the instant cameras' limited controls and features (definitely a spoiled mirrorless camera shooter, but whatever).
Something that fills this gap of wanting instant photos from an instant camera but with digital camera control, and also just getting physical prints is... an instant photo printer!

I think this is the best of both worlds if you want instant photo prints but also the convenience of a smartphone/DSLR/mirrorless camera shooting experience. The Link Wide only works with the smartphone app and maybe the X-S10 (I don't know why my X-T4 isn't supported! Total missed opportunity! This is a Fujifilm camera and printer! It's even got the menu option to connect!), but it's pretty painless to transfer photos to my phone for printing. And then I can select, edit, and print as many copies of any photo I've taken.
I decided I wanted a big print, so I got the biggest of the Instax offerings -- the Link Wide. There's a square and mini photo size as well, but the mini is too small for me, and the square could make fitting normal photos a challenge for me.
(This post is not really a review of the printer, just me rambling a bit, but I am satisfied overall. I can see myself using it consistently for a very long time).
I have printed a lot of photos already. Each photo is about a dollar, so it's definitely not cheaper than ordering prints from my local printer. And the photos are of course on Instax film, not regular photo paper, and they have a washed out, film-like quality. Not true film camera looks. But consistently "old" looking, and I like the aesthetic overall.
This photo of wildflowers from my X-T4 (unedited, straight from the camera) appears vibrant on the camera screen, my computer screens, and my phone. But I print the photo without editing it, it prints with less vibrant colors, and maybe extra brightness.
 |
| Indoor lighting |
 |
| Outdoors in bright sunlight |
 |
| Outdoors in the shade |
Quality is probably a total waste of the megapixels on my X-T4, but that's fine with me. I'll take the time and money later to get some nice, big prints of photos if I want.
The photo preview and actual print does crop the image slightly. I'm not sure why.
Here's the original image, where the tallest lupine flower's top is in view. Close to the top of the image, but definitely visible.

But app print preview cuts off the top of the image. Taking a closer look at all the edges of the photo, we can see the entire photo has been cropped rather significantly.

I assume this is done to avoid white spaces between the photo and the border. But it's a pretty aggressive crop. I've been adding white space with Snapseed to circumvent this if truly needed.
I usually don't use the filter options. I do sometimes (maybe even a slight majority of the time) use the correction screen to slightly lower brightness and saturation, and slightly increase contrast. This produces images that seem "properly exposed" on the print, since images without adjustment can appear overexposed without edits.
Lowering saturation seems counterintuitive to fix photos coming out missing full color. But I've found that for pictures with people, increasing the saturation can make skin look very warm or orange. Lowering the brightness helps with prints being too light overall, and upping the contrast kind of improves the colors without making people into citrus.
I have been storing the prints in an album designed to hold 5"x7" prints. Two Instax wide prints fit into a 5"x7" space, but must be rotated 90 degrees to fit into this album. There didn't seem to be high-quality albums available for Instax wide prints by default. So I got this one instead. Not the best solution, not the worst either.
(Look, it's the wildflowers photo again! Except I edited in some white borders in Snapseed before editing. I think the app crops slightly less than the preview, so there's white in the top border of the print even though there definitely wasn't when I printed it out).


It holds an extra pack of film, the charging cord, a sharpie, and of course the printer itself.
Diamond lake flowers
I have been neglecting my camera, but I finally got a chance to use it recently. California has received some unprecendented rain this year, and the plants are coming back to life! Everything is green and full of pollen. I have been taking an antihistamine every morning to avoid death by sneezing.
My family combined a trip to my grandmother with a trip to Diamond Lake, where there's a nice trail around part of the artificial lake. This trail is bordered by thick clusters of wildflowers and native grasses of a wide variety of colors and textures, and photos can't really convey how pretty it all is.
I used my XT4 and my 90mm Panagor macro for everything. I did have my 18-55mm, but I find myself using it less and less. I do like it, but just prefer the 90mm for most of what I do with my camera.
The macro lens is good for landscapes (technically it's closer to a 1:2 lens than 1:1 but that is totally fine for my hobbyist needs).


All of these images (except the next, which has been cropped) are straight out of camera. This was early in the morning, maybe 8 am, and the light was bright but not harsh. Colors are rendered accurately and generously. I was excited to get everything into capture one and mess around, but I'm honestly very happy with a lot of images as-is. I do want to spend some time and crop a few, and also do minor adjustments, but the camera and the subject did a good job of making some pleasing photographs.


This lizard was kind enough to hold still. I regret not getting a picture with focus on the head and the tail in frame.

Classic California -- lupines and poppies!

Just some flowers.

A very large grasshopper! Also kind enough to hold still for a few photographs. I don't think I'm 100% happy with any -- the ones where the head is in focus crop some of the tail, and vice versa.

I think this was a thistle of some sort. Looked spiky and dangerous but is actually soft.

I do not know what type of flower these tall stalks are, but they provide some visual interest rising above the bright poppies below.

One of my favorites from the day. Just some flowers, being pretty.

More lupines!

A bi-colored flower of some sort. I saw bees frequenting these flowers but did not get a useable image of a bee all day.

Some pretty grasses!

This is one of the early shots when I was figuring out the right exposure/aperture for the day. Turned out very dark overall but I like the effect.

And on the other hand, the brightness of this one just works.

I like these curly flowers.

A pollinator! Poor framing, but this is the only image I got, as it was spooked immediately after and flew away. Some cropping will help the composition.
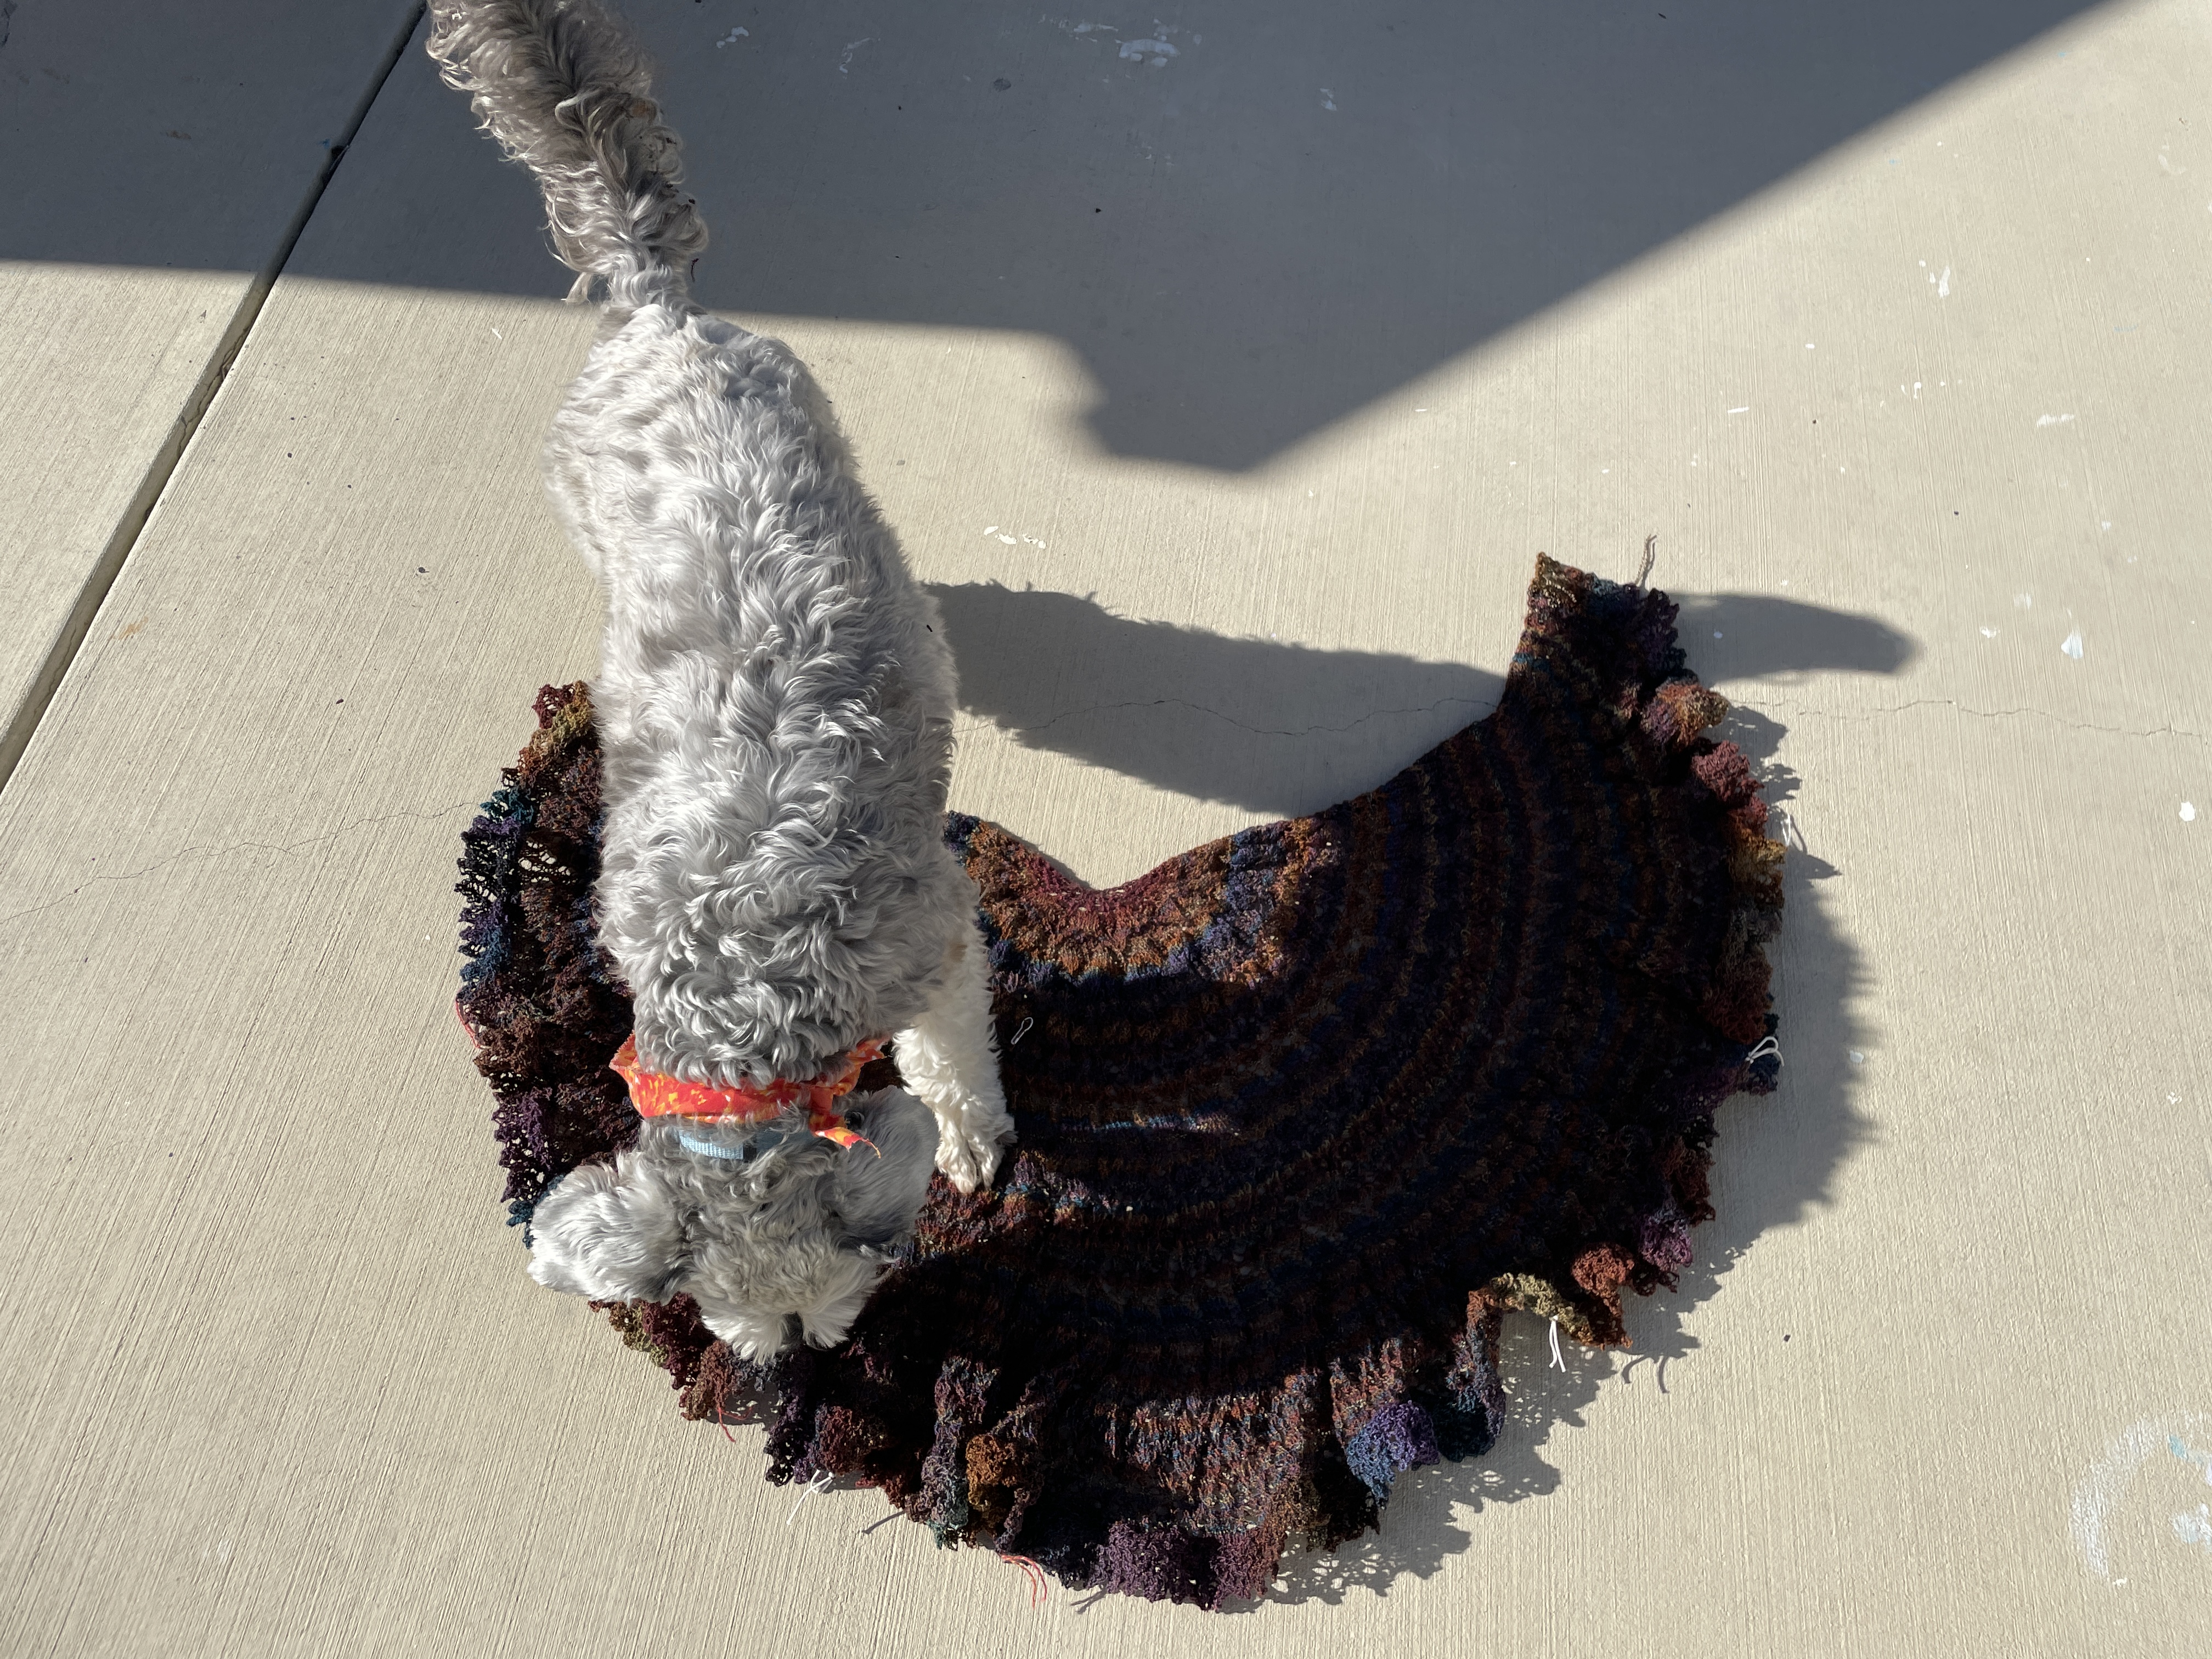
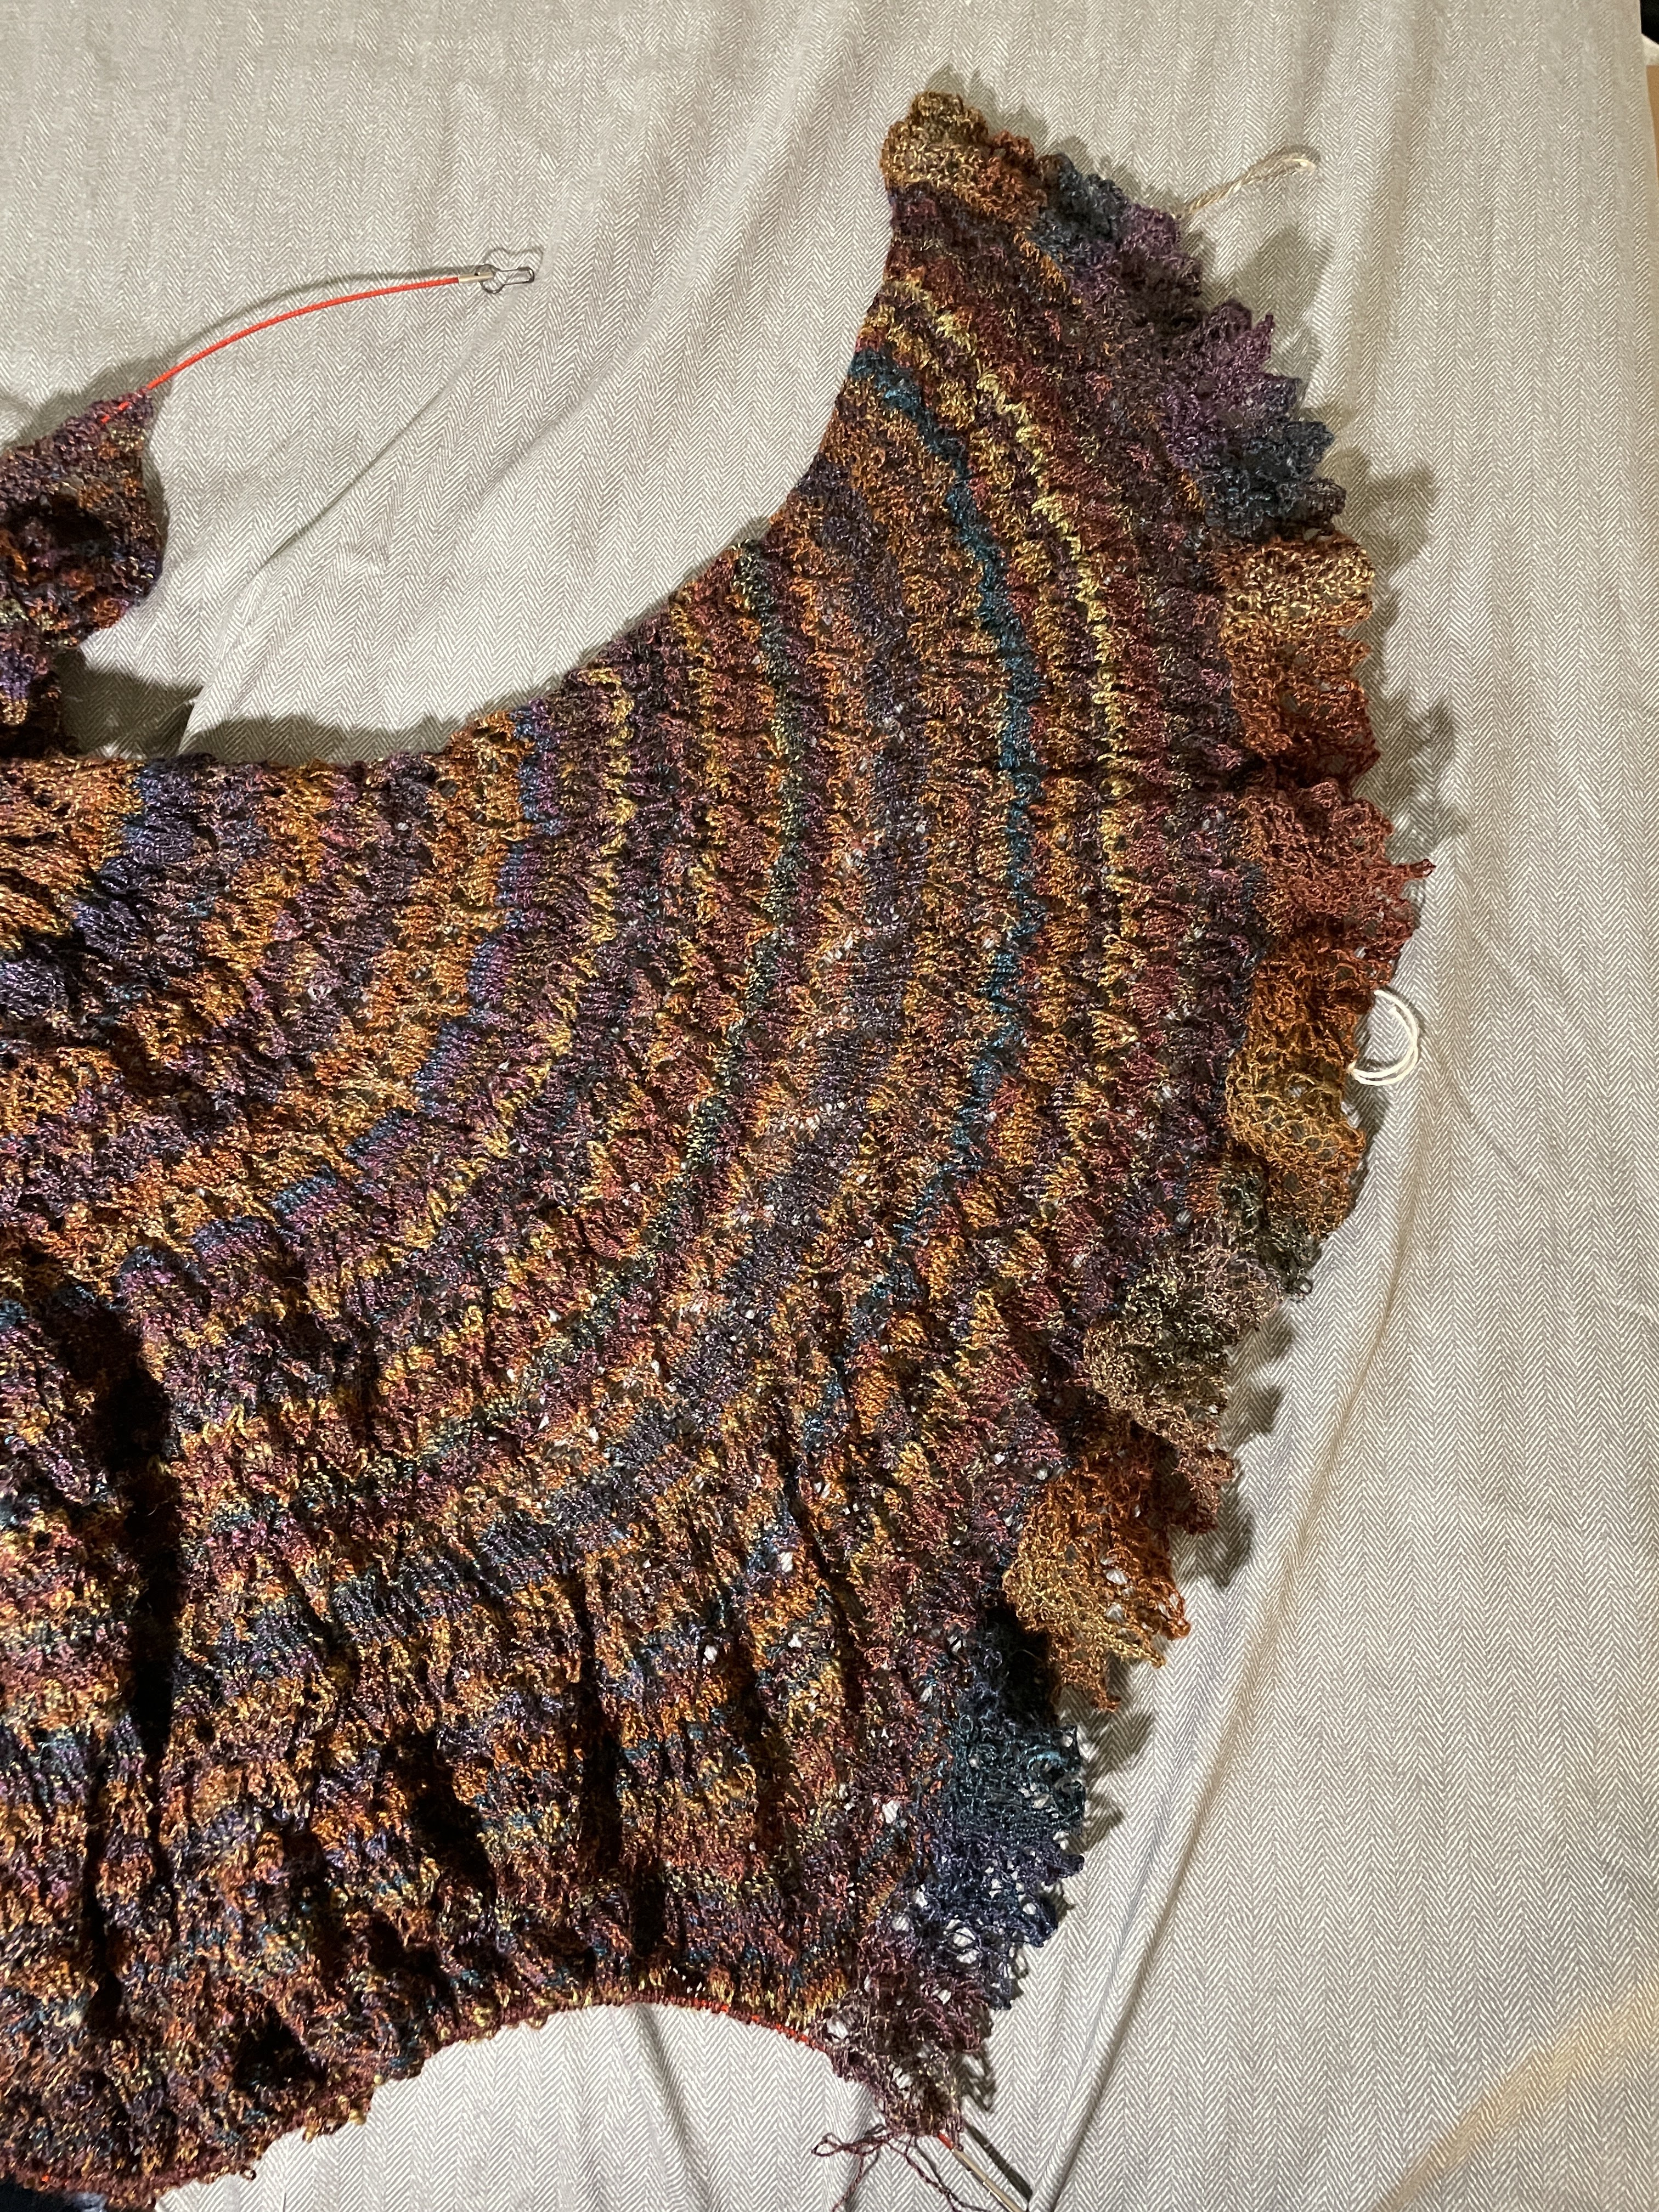
Sunset Carousel: done at last!
This shawl was done a while ago. I finished the knitting and washing and blocking in early February, actually!

I love how it turned out. It's slightly ruffled along the curved edge, and looks nice when worn over the shoulders or around my neck.
The shawl is surprisingly warm for how thin it is.
Before blocking pictures, featuring my landlord's very cute and curious dog.

You can still see the markers on the border. I was tracking how many border repeats I did per day to keep my motivation up.

Hard to tell, but it's very scrunched up and in need of a nice stretch!

Sunset Carousel: the shawl that still isn't done
Well. It's been a week and I'm still knitting away. By my estimates, I still have about 12 hours of knitting! I am doing a different border than the pattern calls for, but after adding a whole new section to the shawl, swapping in a different border doesn't seem all that heinous.
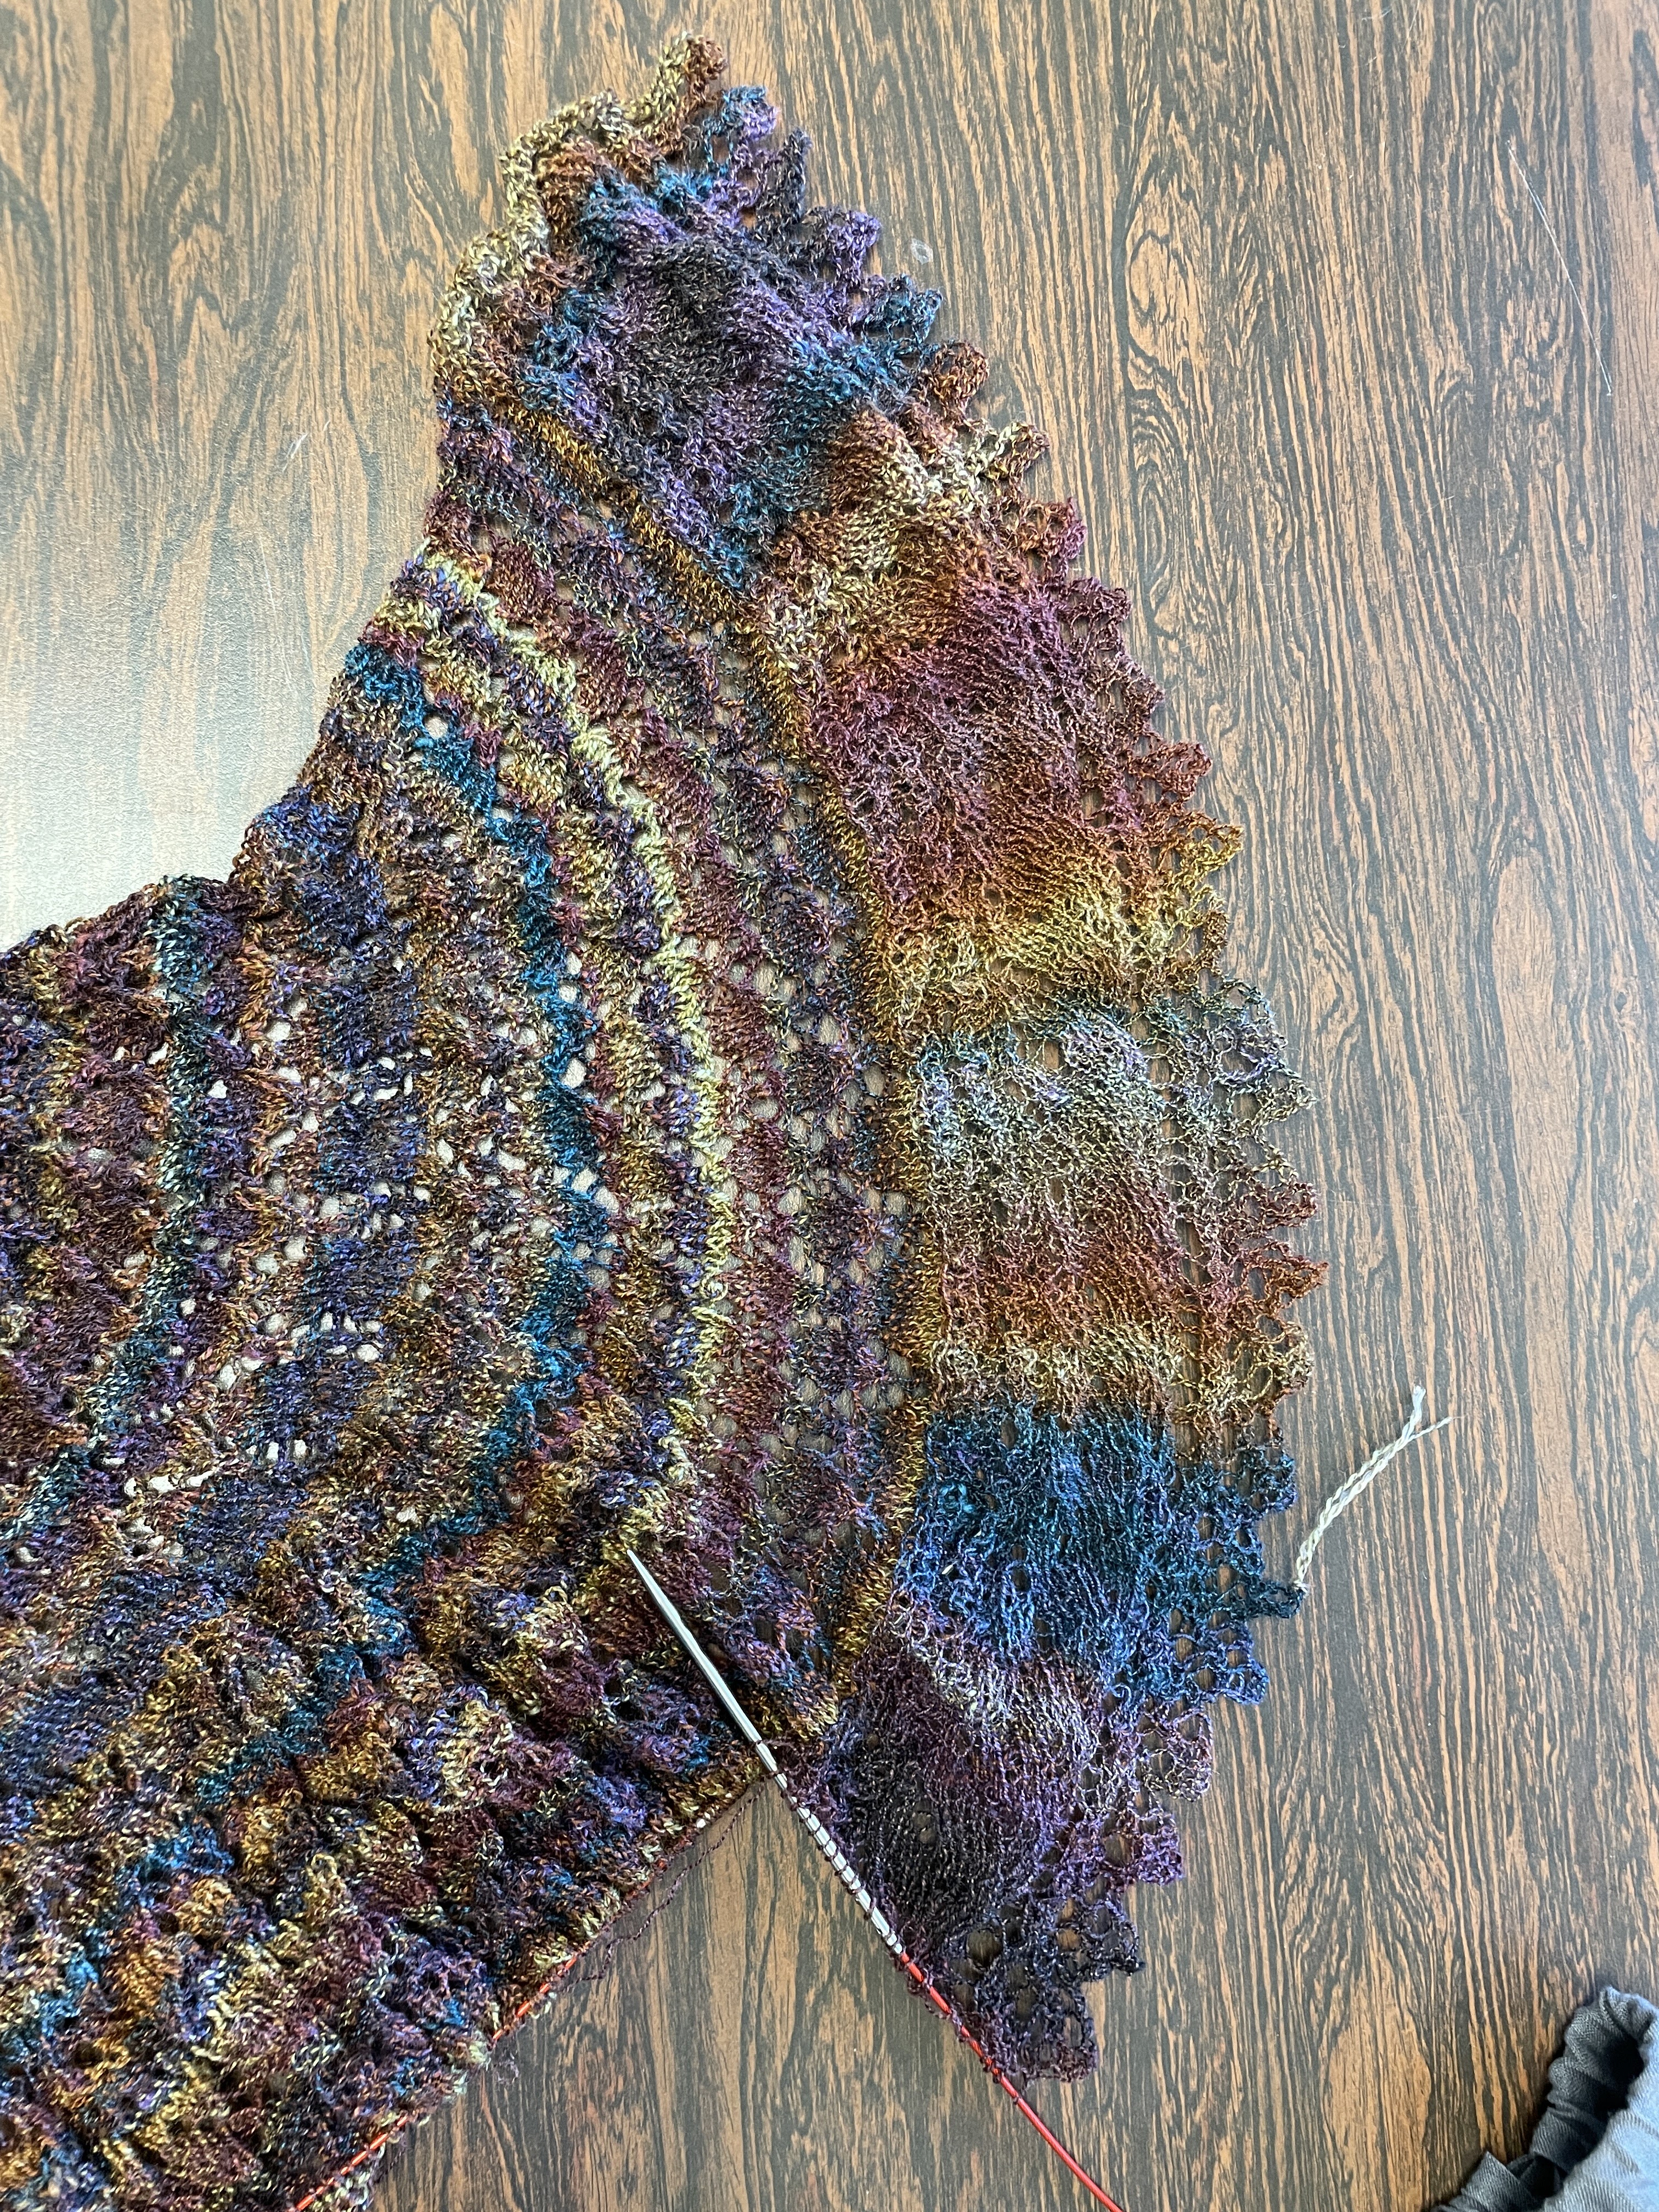

*I actually shifted the first portion by one row so the YOs line up a little nicer.
Sunset Carousel: the shawl that never ends
Semi-circular shawls are a beautiful trap. They start off with 8 or so stitches per row. Not bad at all. Very quick rows lead to a certain sense of accomplishment. Then the number of stitches per row increase, of course, to create the half-circle shape. But you think to yourself, "ahh, this is fine, I am a patient person, I am enjoying the knitting process!"
And then the rows start taking five minutes to complete. Perhaps even ten. Then twelve... I am currently up to a 25 minute row. I am not going to count the number of stitches per row right now, as it would just make me sad. And the stitch count will double at least once more before I'm done!
On the bright side, I'm using quite a lot of yarn!

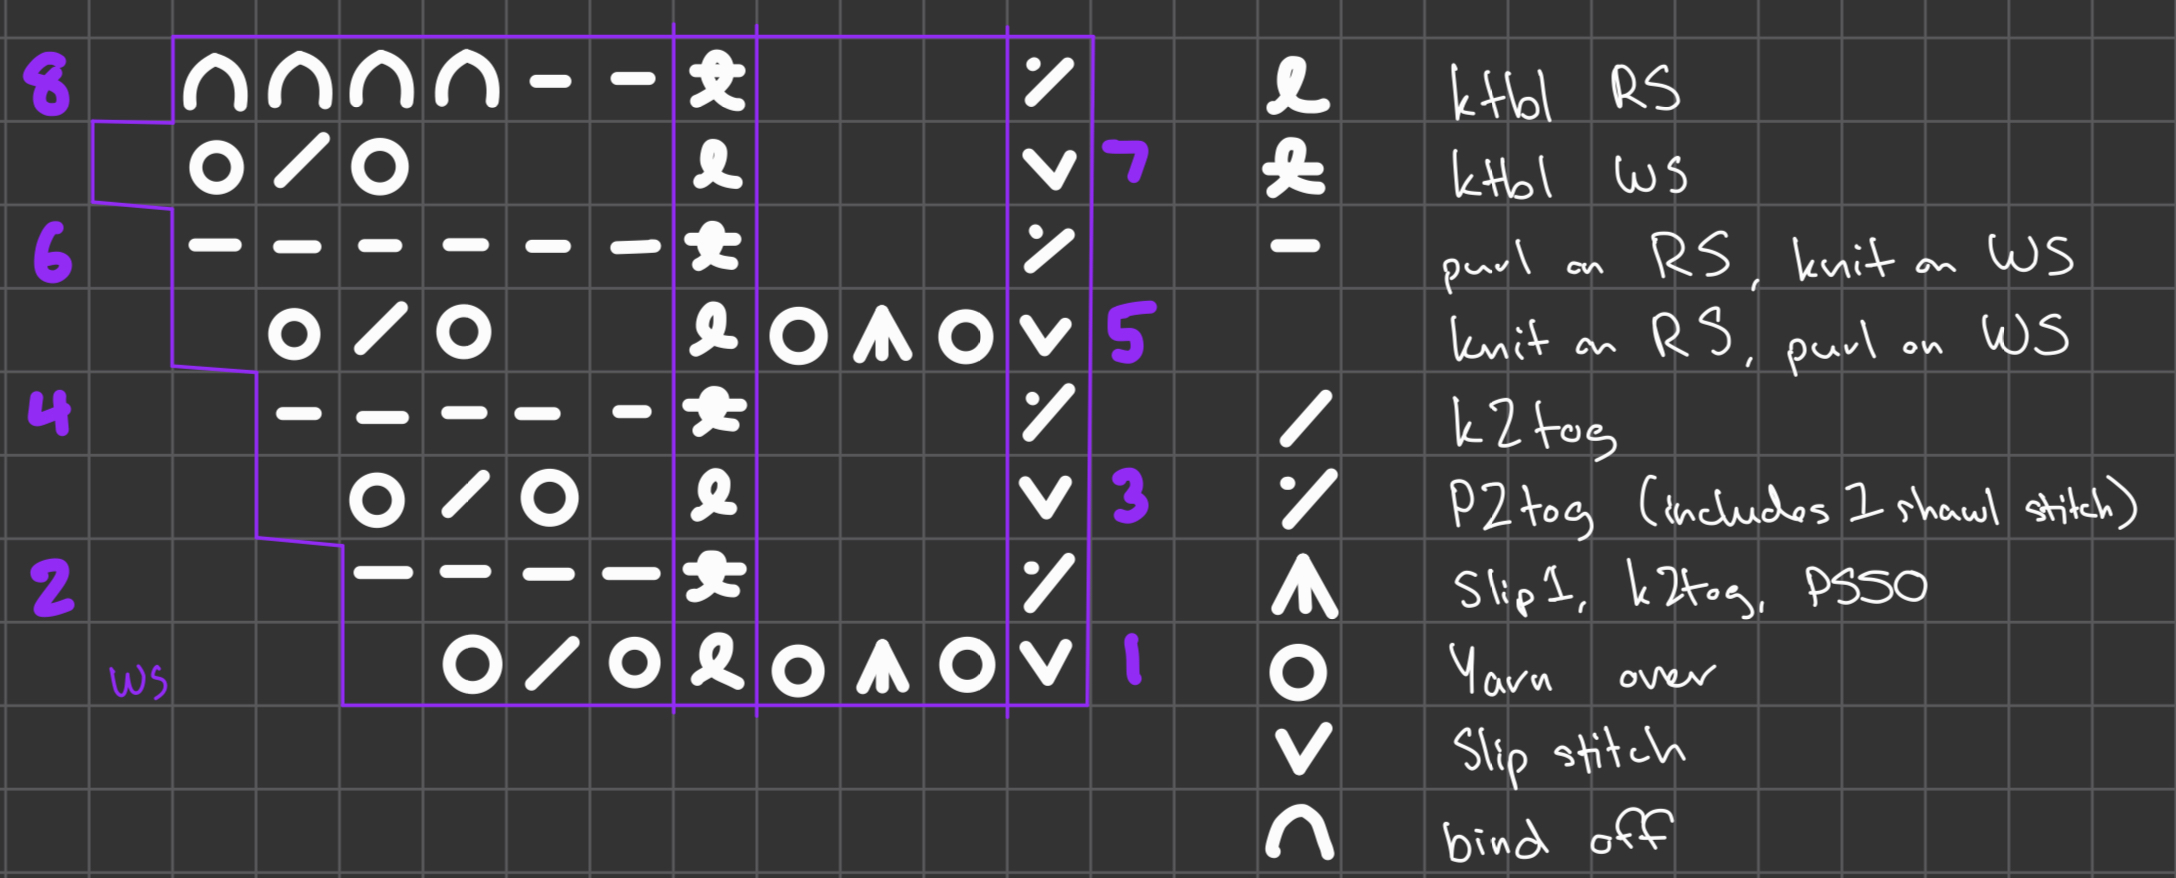
This pattern is very good. I like how the lace looks, and the charts are very reasonable (speaking as someone who previously did not enjoy working from charts).
I was hesitant to start this pattern because I have never knit from a chart before. I have literally sat down and hand-written instructions from a chart rather than read the chart as I knit. But I decided this would be a good project to just learn to knit from a chart. And it wasn't that bad!
I have learned to love charts. I am even adding an entirely extra
section between the second and third charts to extend the shawl and use
more yarn. This chart was easy to visualize and adjust because it was a chart. A written pattern would have been a nightmare to adapt.
But now I am currently forty rows from the end, and I am suffering. I should have been done knitting by now, but because I added another chart, I added quite a lot of knitting for myself.
I'll have a completed shawl eventually.
Chain-plied mystery fiber, from a plying ball!

Chain-plied, of course, as it is my favorite plying method. But this time, I plied from a plying ball!
I only had a vague idea of what a plying ball was before yesterday. I knew some sort of vague hand-wavey explanations of how to create one, but hadn't made my own just yet. But yesterday I found myself with no extra bobbins and a single that wanted to be plied up, so I made a plying ball to free up my bobbin.
If you've ever chain-plied from a bobbin and also wound your own ball of yarn, you are fully qualified to wind your very own plying ball for chain plying.
Here's the very start of mine, winding the ball directly from my spinning wheel:


Winding it tightly also helped keep the energized singles from tangling. As you can see in the ball-in-progress picture, the singles really want to tangle up.
I kept the brake band on my spinning wheel while I chain "plied". That helped keep the bobbin from running wild.
Plying was very fast. Usually when chain plying, I end up needing to use a slower speed on my wheel to form the chains. But when using the plying ball, I found myself using the same speed that I used to spin the singles.
The yarn was slightly underplied initially.


I am very happy with how the yarn turned out, however, there's not very much yardage!
I cast on a hat, and realized that I would have enough for maybe three-quarters of a hat. Definitely more than half a hat. But also definitely not enough for a full hat.
Not sure what my plans for this yarn are anymore. I was really looking forward to an aran-weight hat!
The yarn is currently in time out for not producing enough yardage for a hat.
Learning to tat! With yarn, not ink
Tatting is a surprisingly ambiguous word. Yarn or ink? Both can involve needles, technically!
I enjoy picking up new yarn hobbies, and I've only ever heard of tatting -- never seen examples of it, or met anyone else who tats, or even knows what tatting is ("like tattoos?"). Tatting is a pretty old fibercraft, and is much less efficient at creating fabric than knitting or crochet or weaving. I think it's primarily a decorative craft, as tatted fabric is fairly open and lacey, and would not drape well.
In any case, I finally purchased some tatting shuttles and needles and embarked on a short YouTube tutorial journey.
It seems like most tatting tutorials and patterns are geared toward shuttle tatting. Needle tatting is much easier to learn than shuttle tatting, says the internet. I would agree with this claim.
I tried shuttle tatting first because the shuttles arrived a few days before the needles did. It did not go well.
These are some of my first few attempts. The very first attempt is not pictured here because it was just a mass of tangled thread. Getting the knot to flip was difficult and I failed to do so quite a few times, so rings didn't close properly.

My first attempts at needle tatting went fairly well by comparison. My actual first attempt at needle tatting is on the left -- I was able to make a ring and close it. On the right are attempts at following a pattern.

My main issue with shuttle tatting was I was pulling the thread too tightly, and that issue is fully eliminated with needle tatting, since the tension is limited by the circumfrence of the needle. Another issue I had with shuttle tatting was flipping the knot -- again, that's not an issue at all with needle tatting since stitches are formed directly on the needle rather than on the thread itself.
I made some doilies with a variety of threads. The rainbow was the first one (and has a mistake!), then the pink, then the green. Pattern from be-stitched.

I learned from these doilies that you can needle tat from the ball -- ie thread your needle with a long thread, and then make stitches with the ball thread, rather than that long thread.
I have also learned since completing these that the stitch after a picot counts as a stitch, and not a picot. I thought "picot" meant "leave a space, do a stitch", but it really just means "leave a space before your next action". Which may explain why those doilies are a bit floppy.
I kept trying shuttle tatting every now and then. I'd pick up a shuttle and try a ring, fail, and put the shuttle down. The rings got better with time. Eventually I was able to make a ring whenever I wanted to. Then I tried picots -- getting the stitches to stay flipped after a picot introduced a new challenge.
After a while, picots became easier and more consistent. For the doilies, I had to learn how to do a chain, and that was the next thing I tried with shuttle tatting. Like needle tatting, you need two separate yarns going at once to make a chain (as far as I know). So I also learned how to manage two shuttles at once.
I found a new pattern from Tatting by the Bay's free pattern section: Solstice. I thought it was appropriate to try out since summer solstice was coming up at the time.

The top left piece was the first try. I was posting the shuttle and doing half stitches at start/end of chains to make everything neater (from this YouTube video), and individual rings and chains did look slightly neater than previous attempts. But even though I was reversing work properly (intuitive guide to reversing work on YouTube), nothing was lying flat.
So I started over, which is the piece in the middle. Slightly neater, slightly flatter, but transitions from rings to chains and chains to rings was still not very neat. I was having a hard time telling where to put threads (front to back? back to front?) and thought that was the issue. And so I started over again.
The piece on right was the best-looking attempt, but again, it's pretty wonky. I started the second round of the pattern and decided it wasn't getting better.
Here's that piece on left from a shallower angle:

Obviously something's gone wrong. I went back to a sample pattern Tatting by the Bay posted, because I recalled something about the red/blue colors being explained in that pdf. And immediately figured out the issue.
I assumed the red/blue simply corresponded to shuttle color. That was a bad assumption. The colors actually correspond to the color of thread forming stitches on that section of the pattern. So for rings, I was getting it right, because rings are formed with one shuttle. But for chains, I was getting it wrong.
My fourth attempt with threads where they should be:

The picots are probably far too large and there are some tension issues still, but everything is lying flat and I don't have to try and figure out where threads are supposed to go when moving between chains and rings. The ends just sort of intuitively fall where they need to.
Tatting is a simple fiber craft to pick up, but simple things are more difficult to do well. And tatting techniques range from tedious to ingenious and innovative all at once.
At a basic level, tatting is just the double stitch and picots. And then there are rings versus chains. But how do you reverse work? Also, how do you know when to reverse work? How do you join in new thread? How do you make neater joins? What's a cluny leaf? A split ring? An onion ring? What's a magic square?
Weaving silk scarves on my 8-shaft Gilmore jack loom
I have woven some samples and smaller things, but these scarves are the first "real" products with this loom.
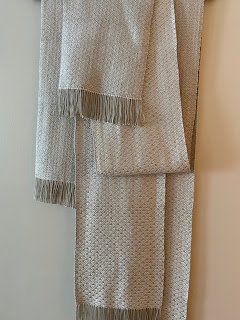
I don't have very flattering pictures of the scarves together, and have already sent one to my mom, but they are beautiful in person. Shiny, because silk. And soft, probably again because silk. They drape really nicely and I think have a subtle but visually effective weave.
I ended up liking the reverse of the fabric better than the intended right side. I discovered that while sampling, so for these scarves, I reversed the tie ups so I was looking at the wrong side of the fabric as I wove. This was actually a really good thing, because it not only significantly simplified the tie ups and treadling pattern, it also was easier to spot treadling errors with the wrong side facing up.
The pattern is one I found online:

I chose to use a gray for the warp and white for the weft. I liked the white as weft better when sampling, and the white silk had a lot more knots in the skein. I didn't want to deal with knots in the warp, so that also affected my decision to put the white as the weft.
Even though I avoided knots in the warp, I still had issues. I wound the warp on a warping board, and did the winding in three or four sessions. I believe I had different winding tension between sessions, or maybe even differing from start/end of sessions, because the warp had a lot of mismatched warp threads at the end. Dressing the loom was a bit of a disaster because of that, and also because I don't have lease sticks yet.
I ended up winding the warp on to the warp beam, then forward onto the cloth beam, and then back onto the warp beam again while combing it out. That resolved all the tension issues but left me with very uneven warp ends at the cloth beam. The ties there looked very scrappy, but they held. I think I lost three inches of warp because of this though.
Dressing the loom took me all day Saturday. I completed 120" of weaving on Sunday, and the rest Monday evening after work. I think to optimize weaving time, longer warps are needed! I'll have to get better at making warps and dressing my loom though. I don't think my process to fix the warp for these scarves would have been as workable with a longer warp.
I wet-finished the silk scarves similarly to how I'd wet-finish woolens. Just a little more careful to not put hard creases anywhere. And the internet recommended vinegar in the second-to-last rinse because silk is acidic (citation needed?) so it's best to try and restore the fiber to a more natural pH. Not sure if that claim holds up to fact-checks, but I did it, and nothing terrible happened, so there's that.
While
the fabric was damp, I ironed on low heat. Maybe a little aggressively,
because the yarn did get a little compacted. The fabric at this point
was a little stiff and dense, but thwacking it on a chair loosened it up
again.
Some fun details:
- 6 yard warp.
- 15 EPI.
- 158 ends (12 stitch pattern repeat, times 13 repeats, plus two floating selvage threads).
- Finished scarves were 8" wide and one was 84" long, the other was 96" long.
- I had about 6 more inches of the warp after the second scarf was completed, so the first could have been longer!
- Warp and weft were ~2,000 YPP 2-ply silks.
- I have probably a third of the gray left, and maybe a sixth of the white.
- Fringe is about 2 inches for each scarf.
Process pictures:
All set up and ready to dress the loom!

Here's the warp by itself, because it was a quite pretty (before I realized it was... slightly problematic):

Some initial weaving. I haven't yet gotten the muscle memory for neat selvages:

Some satisfying hemstitching between the two scarves:

The finished scarves. The scarf on left has the pattern's right side showing, the right scarf has the wrong side showing:

Ravelry project page.