I have a loom!
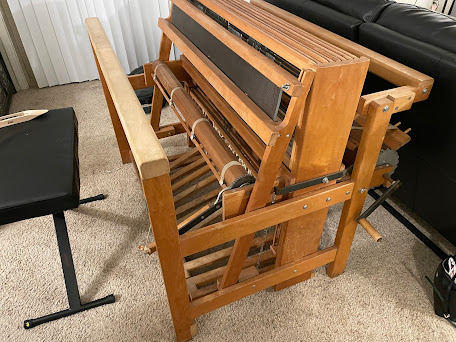
This is an 8-shaft Gilmore loom with 12 treadles and a 40" weaving width. It has a sectional warp beam and easily removeable breast beam (the beam just sits on some dowels, no bolts or anything, super convenient). And it was made in June of 1987. Older than me!
The loom has the original metal heddles and original cotton tie-ups. I don't think Gilmore sells either of those anymore. Gilmore also doesn't sell 40" looms now, as far as I can tell. When I contacted them about extra reeds, Bob told me they weren't going to be restocking reeds for the 40" and referred me to the Woolery. Unfortunate but understandable.
I paid $700 for it, which I think was a pretty fair price. It's in perfect working condition, but didn't come with a bench (the bench in the picture is my piano bench), and didn't come with accessories like a shuttle or bobbin winder (the shuttle in the picture is one I bought the same day as the loom).
Probably too much unecessary detail in those last few paragraphs, but I'm very excited about all those unecessary details.
Warping a floor loom is somehow less frustrating and tedious than warping a rigid heddle loom. I'm not sure what it is. Threading the heddles was kind of fun, and hopefully the novelty of the experience won't wear off.
Weaving on a floor loom is much more physically-involved than weaving on a rigid heddle. It's still a much faster process than weaving on a rigid heddle loom though, mostly because of the boat shuttle.
This loom is well-made and really enjoyable to use. I'm looking forward to weaving on it as much as possible in the future.


My first bit of weaving! The selvages are very wonky, but I have remedied the issue. Mostly due to the cloth line (?) being too far from the reed, and the bobbins being wound too loosely.
And now for some other random thoughts and things I learned:
- Don't drop the cross when warping.
- DON'T DROP THE CROSS WHEN WARPING.
- don't drop the cross when warping.
- Wind bobbins really tightly, but do not overfill them.
- Less tension on the warp isn't a bad thing.
- The warp has to go over the back bar before being threaded...
- Release a bit of tension on the cloth beam before advancing the warp.
- I learned how to read a weaving pattern.
- I learned why my tension was so bad: "My selvages are loose with loops extending beyond the weaving. Why?".
- I learned about sett/yarn weight, which is A Thing I know of but continuously forget how both the things line up.
- Another Thing I know but continuously forget is hemstitching.
More macro!
I went out again today and took more pictures. The sky was still very overcast, but I went out in the afternoon, so there was more light. I took my tripod with me but didn't end up using it because I was walking around so much, and I could generally get sharp "enough" images after a few tries.
The first thing I happened to photograph was this cute butterfly that kept walking around on the flower and didn't want to be photographed.
 |
| Photo op! |
I got a few more pictures of it, though not any great ones.
 |
| "Cinematic" (ha) crop at 16:9. I think the antennae is in focus but the rest of the butterfly is not. Oops. |
This is my favorite one, even though it's the butterfly butt and it's mostly out of focus. You can see the scales on the wing and the shallow depth of field creates an interesting effect in my opinion. I'm amazed at the detail I was able to capture!
 |
| Butterfly butt! |
 |
| Some sort of daisy. Still slightly more blurry than I'd like. |
 |
| Yummy eucalyptus leaves! Don't eat these unless you're a koala, or whatever bug is eating them here. |
I also re-tried the "use the macro lens as a telephoto lens" thing and had mixed results. After a lot of modification in Capture One Express (exposure down, contrast way up, brightness up), the images look closer to real life. I think the contrast is the biggest thing missing from the straight-out-of camera images.
 |
| Super weird to see banana trees in an area with oak/eucalyptus. Apparently this area had a nursery and they just left some plants when they closed up shop. |
 |
| Yes, need to clean my sensor. But also -- look at those brave people! |
Still excited to use this lens even more. I hope that there's better light next weekend. And in a month or so, monarch butterflies should be migrating and taking their annual break very close to me -- hopefully I can find a time with fewer people to visit in a COVID-friendly way.
Equipment I use
This blog is not sponsored by or affiliated with any of the following brands/products, I'm just providing this list for people who are curious about this sort of thing.
Photography:
- Fujifilm XT-4
- Panagor 90mm, f2.8 (Nikon lens mount, but I have an adapter)
- Rokinon 14mm, f2.8
- Fujifilm XF 18-55mm, f2.8-4.0
- Fujifilm XF 27mm, f2 R WR
- Fujifilm XF 35mm, f2 R WR
- Previously I used a Nikon D40 and various Nikon lenses...
Spinning:
- Daedalus Starling V3
- Used to have an Electric Eel Wheel Nano 1.1!
Weaving:
- Gilmore 8-shaft, 12 treadle jack loom (40" weaving width).
- Made in 1987!
- Used to have an Ashford 24" rigid heddle loom
Knitting:
- Mostly Chiaogoo interchangeables: 5" tips, and lace minis
- Have a ton of random dpns and straight needles I've accumulated over the years
- Silver Reed SK10 and SR10
Sewing:
- Singer 201-2
- Various Singer sewing machine attachments
First pictures with a Panagor 90mm, f/2.8, 1:1 macro lens (and "my" Nikon D40)
I have a Nikon D40. It is a relatively old crop-sensor DSLR (announced in 2006!), and it isn't actually mine. It's my dad's camera. But I borrowed it and he hasn't needed it back yet, so it lives with me. It has a whopping 6.1 MP, can shoot up to 2.5 frames per second, and 3 auto-focus points. It cannot do video.
However, it definitely works and takes pictures!
I've wanted a macro lens for quite a long time. The only thing stopping me from getting one is the cost of macro lenses. They are, to put it lightly, incredibly expensive. And I wasn't sure I wanted to invest a lot of money for a nice lens if I wasn't sure I was going to stick with a Nikon body for the future, since I do want to upgrade to a newer camera soon.
Two days ago, I found a listing on craigslist for a $95 macro lens, Nikon F-mount. Too enticing to pass up! I bought it from the seller today.
 |
| Each of these dead flower buds was about an inch wide! Not super sharp, yay for unsteady hands. |
The lens is totally manual. Aperture and focus are controlled on the lens, and it's so old that it doesn't communicate with the camera at all. So images don't save with aperture info, and I also don't get exposure information -- lots of test images are needed.
Here's the lens fully retracted:


My SO made some, ahem, colorful remarks about this lens's ability to elongate so magnificently.
The markings on the lens are still sort of a mystery to me. I know some correspond to magnification level, and some appear to be distance to object for focus. There are still a few I haven't figured out though.
The focus ring is nice and heavy -- it takes quite a few turns to get from one end to the other though, definitely not something that would be fun to use for a fast-moving subject. The aperture dial has clicks for half stops as well, and is a little less clicky/heavy as the one on my Rokinon, but still nice to use.
The lens is in very good condition and works beautifully as a macro lens. It's a pretty bad telephoto lens, but can produce some passable shots. Doesn't seem to do portraits well, but would make some interesting photos, I think.
My main issue in picture-taking is my really shaky hands, and without any stabilization in the lens or in the body, I generally need a very fast shutter speed and very wide aperture to take sharp pictures, plus good light. (Tripods would help, of course, but they're heavy and slow to set up). That means very shallow depth of field, and if the subject moves (wind!), the picture gets blurry all over again.
Right after I picked up the lens, I went out to a fairly secluded area (because COVID) and took some pictures. It was overcast, and the light disappeared pretty quickly after the first thirty minutes, and it was also pretty breezy, but I did get some nice pictures. I also got a ton of terrible, blurry pictures. Have I mentioned my shaky hands?
I'm excited to go out again and re-try with better light!
 | |
| The very first picture I took (with the "proper" exposure, more or less). I hadn't bought the lens just yet... |
 | ||||||||||||||||||||||||||||||||||||||||||||||||||||||||||||||||||||||||||||||||||||||||||||||||||||||||||||
| One of the next few, right after I bought the lens! No blurring added in post, no cropping. 1:1 magnification and slightly blurry, but still awesome. The plant was a couple feet across and this is just the center. |
 |
| Dead flowers. |
 |
| More dead flowers! Different type this time. |
 |
| Dead grass. (Notice a trend? It's autumn, everything is dead right now). |
 | |
| Using the macro lens as a "regular" lens. These are the same flowers as in the first picture of dead flowers. |
 |
| Go Gauchos! Trying to mimic a telephoto. This was the sharpest it wanted to get. Pretty dang fuzzy, even for the D40. |
 |
| Better attempt at a telephoto lens. Taken from the top of a hill, ~50 feet away from the birds. |
Read More
I bought a Silver Reed SK10 and SR10 knitting machine!
I've been considering a CSM (circular sock machine) for a while, but my budget has kept me from buying one. I really want the ability to crank out sock snakes and hand-finish the heels and toes. I discounted flat-bed machines because how would you knit in the round on a flat-bed machine?
And then I stumbled on a post that said you can in fact knit in the round, or, knit tubular as machine knitters are more likely to say, on a flat-bed machine. The secret? A ribbing attachment! (Or a double bed machine, but those are fairly rare).
So I started the hunt for a knitting machine and ribbing attachment. I found the perfect machine for me a few weeks ago. Here it is knitting a ribbed cowl:

My requirements were a machine plus ribbing attachment, in working order, with everything needed to start knitting (minus a sponge bar). Also something local, because shipping for these machines gets expensive and can destroy the machine. And of course, something in my price range!
I searched through Craigslist, NextDoor, Ravelry (the machine knitting group has a great thread to evaluate machines for purchase!), and finally Facebook Marketplace, where I found a listing for a machine that fit all my requirements. However, it was three hours away from me, and had no built-in patterning ability. I decided that lace and colorwork were nice things to have, but not requirements for me. After all, I wanted a CSM for cranking out sock snakes at lightning speed, not fancy patterning.
So I decided to buy the machine. The seller was kind enough to demonstrate it working and give me a few pointers while I was there to pick it up.
I did not set it up as soon as I got home -- I was quite exhausted after driving over 6 hours through traffic.
But first thing the next morning, I set it up and started figuring out how to use it! This is the first picture of it in my apartment:
 |
| SK10 + carriage + cute row counter |
One of my favorite parts about this machine is the row counter -- it's seriously so cute.
My goals were: figure out regular flat knitting, figure out ribbing, and then figure out tubular knitting. I ended up slotting "deep clean" into that list as well. It may not seem clear from this picture, but it was in need of a thorough cleaning. I made a video about the process here: YouTube.
Figuring out the basics of machine knitting were a little difficult since I didn't actually have the right cast on materials. I ended up using the ribber cast on comb in a way that it shouldn't be used, but eventually I got some knit fabric! (the picture shows some stitches haven't knit off properly -- ignore that).
 |
| Improper use of cast on comb... |
My first few swatches:
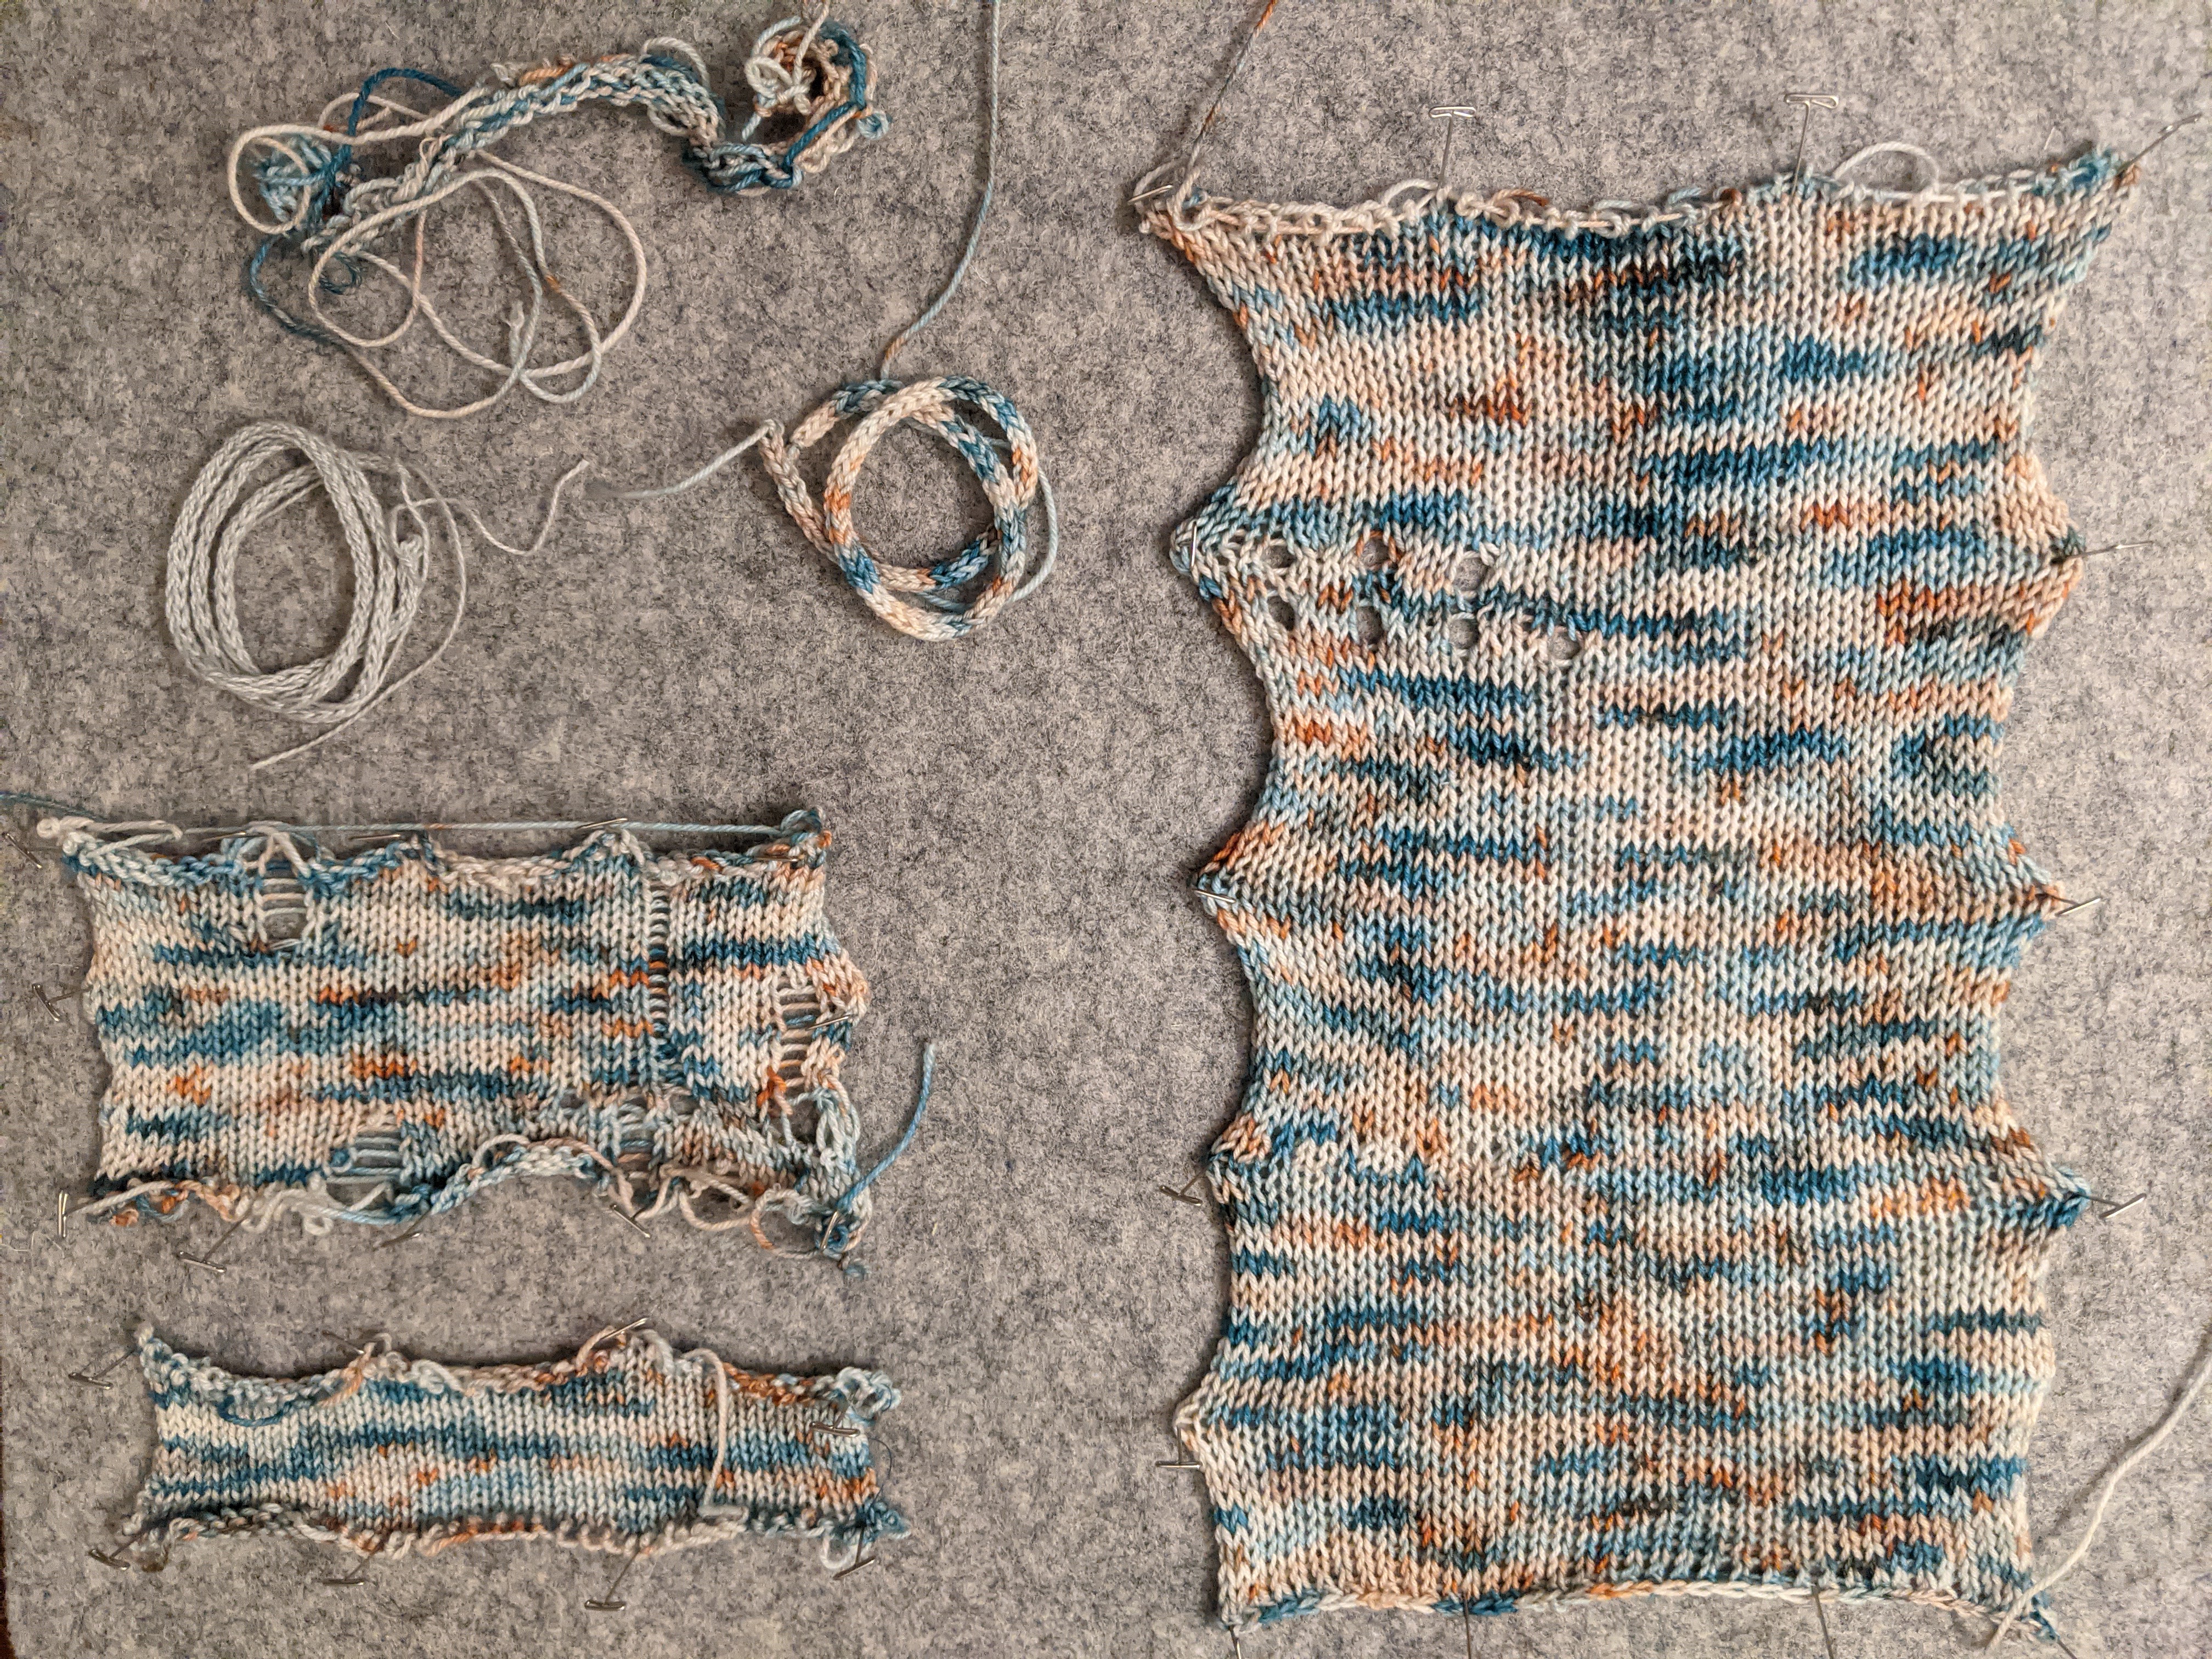 |
| More and more success, from left to right. |
 |
| Manually-selected tuck stitch! |
I was able to figure out ribbing fairly easily, though tubular knitting took a little longer.
Tubular knitting on this machine is a little different from most modern machines, where the two carriages lock together and move as one unit.
There are four steps for every row of tubular knitting on the SK10/SR10. Written explanation below, video demonstration here: YouTube.
Set up: both carriages on the same side, let's say the right side. Main carriage is set to slip in one direction -- since we're starting on the right, it will slip from left to right. Ribber carriage is set to raise needles in one direction without knitting, and lower them in the other. Since we're starting on the right, we will set the carriage to raise needles from right to left and lower them from left to right.
Right to left:
The first pass is the main carriage across the main bed -- the stitches knit as usual. First half of the row is complete. The next three carriage passes are how the stitches on the ribbing attachment are knit.
The second is the ribber carriage across the ribbing attachment -- the needles are raised up but do not knit (if they lowered/were knit here, the stitches would just drop off).
Left to right:
Now the main carriage moves across the bed, slipping all stitches. This lays the yarn across the ribbing attachment's needles.
And finally, the ribbing attachment carriage moves across and knits stitches, leaving the needles lowered in preparation for the main bed's stitches to be knit in the next round.
The manual does say all that, but not very well, I think.
But anyway -- I've now mastered the basics of this machine and look forward to making some sock snakes!
I've tackled hats already but for some reason I'm hesitating with sock snakes, even though they're pretty much the same concept:
 | |||
| Machine knit, hand finished |
By the way, I wrote up the hat pattern: Ravelry. It's available for free!
Hopefully I'll have completed some sock snakes by the next time I post. I've ordered some very pretty sock yarn from Etsy that I'm excited to share. Counting the days till it arrives!
I now have a tiny YouTube channel, for no particular reason
Channel: Mirith.
I've always wanted to make YouTube videos, but haven't really acted on that desire. I think the main blocker to actually making those videos was not knowing what my niche would be. But after some recent thought, it's fairly clear that fiber crafts are my "niche". Knitting, spinning, crochet, even quilting and sewing, are integral parts of my life.
Another issue with video creation was that I also don't have a suitable camera for video, and was always intimidated by the idea of "video editing" -- my personal laptop is a powerhouse for word processing and web surfing, not video manipulation.
But after the "content niche" realization, I had a couple other realizations. My phone's tendency to overheat and shut off after a three minute video could be worked around with shorter videos stitched together. And my work computer is much more powerful than my personal one, and is also a Macbook, so it has iMovie available for free.
And anyway, everyone has to start somewhere.
The reason I bought my EEW Nano is pretty much the same concept. I knew I had an interest in the process of yarn-making, but wasn't quite sure I'd really like spinning in practice. So I really didn't want to spend $700+ on a wheel that I would end up not enjoying.
My YouTube certainly doesn't have a ton of content (only one video right now!), and the production quality is... dubiously average. But hey, it's a start. And I didn't have to spend any of my money, just a lot of time recording and re-recording!
I also realized just how many times I say "uh" or "um". High school/Mock Trial me would be very disappointed. I've edited as many as possible out of the video, but a few made it in since they were too closely attached to neighboring words!
So if nothing else, I'll be making a more conscious effort to eliminate those crutch words from my language, which is definitely a good thing in my books.
Spinning yarn: lots of pictures of handspun!
 |
| 700 yards, chain-plied, laceweight silk/wool blend. Smoldering Fire from Three Waters Farm. |
 |
| Worsted-weight alpaca/silk from Upstream Alpacas, in the Silver Chalice colorway. |
 |
| Hand-woven scarf from the alpaca/silk handspun. Gave it to my mom! |
 |
| Sport-weight two-ply, Paradise Fibers' "Wisteria". |
 |
| Super soft alpaca from Upstream Alpacas, in the Winter Gorge colorway. Fractal-plied. |
 |
| Handwoven scarf from the above handspun yarn. Cottolin weft from Gist yarns. |
 |
| Wool chain-plied, "Granada" from beesybeefibers on Etsy. |
 |
| Undyed wool yarn, from beesybeefiber on Etsy. |
A venture into spinning fiber into yarn

 |
| Squishy squishy roving! |
 |
| Yarns #1, 2, and 4 |
 |
| Yarn #3. Well, it was supposed to be a yarn. |

 |
| Yarn #5, plied and caked. |
 |
| Swatching yarn #5. Only used half. |
What to do with an awkward quilt backing: turn it into a robe
Around the same time, Iordered this quilt backing from Missouri Star Quilt Company to make myself a weighted blanket:


I, however, failed to realize that 108" wide ombre was not what I wanted for a 54"x72" quilt backing -- it would have made a weird, unbalanced pattern.
So the fabric just sat for a while. I love the colors and fade from a pale minty blue to deep navy though, and really wanted to use it in something that could show off the colors well. I initially thought dress, but then I remembered I wanted to make a robe.

I had to modify the pattern a bit. Mostly because I failed to notice that my hip measurement was the one I should have based the pattern widths off of -- I added some emergency godets to help the robe close in front.
 |
| Robe pieces, before I stitched them together and figured out I cut them too small... |
 |
| Emergency godets |
 |
| Not how things were actually stitched, but just illustrating how the godets were inserted! |
For the contrasting binding, I cut a 5" strip from selvage to selvage, the cut it at the center, and sewed the selvages together. Then attached some lighter colored scraps from other pattern cutting to get the correct length. The colors contrast really nicely with each other, I think.
 |
| Binding pieces |
I hemmed the sleeves very carefully, as I didn't want visible stitches. I took my time and only picked up two threads on the outer part of the sleeve. I used a cream-colored thread, and that combined with the tiny stitches means the line of stitches are almost invisible from the outside.
 |
| Can you see the stitches? |
Even after making a full-sized robe, I still have plenty of fabric left over, and haven't decided what to do with the rest!
Ektelon Model H: necessary pieces
Obviously, the above was sarcasm. I am not very qualified, and any advice you take here is advice taken at your own risk.
Anyway, on to the advice. Please enjoy this lovely diagram with some very official labeling:

I couldn't find anything like this online when I was trying to purchase this machine.
The internet has told me that the glide bars and tension head are the most expensive things to replace. I assume the clamps would be the next most expensive. The person I bought the machine from said that the tool I marked with the purple arrow was very useful, and I should try to not lose it. I definitely agree it is very useful. It tightens/loosens/adjusts almost everything on this machine.
If you can look at the machine in person, I'd recommend seeing how the tension head moves, how the springs in the tension head look, how the glide bars look (no obvious visual/tactile defects in the metal), how the clamps move, plus making sure there's no rust. Surface rust is less of an issue than deep pits of rust, obviously. I wouldn't trust a machine with substantial rust to handle high string tension.
Ektelon Model H: a happy purchase
I've subscribed to Tennis Channel, read Brad Gilbert's Winning Ugly, and listened to other fellow tennis players talk about jumping fences to sneak a couple sets in from time to time.
And then, while browsing NextDoor, I saw a post for a stringing machine (many sections censored, because internet).

Even though it was a fairly high price for me (a few hundred dollars), I still was interested. It was originally listed for a bit more, but I assume the owner dropped the price after it didn't sell for a while.
I looked up what an Ektelon Model H was and found many online references to this machine. It is generally highly-regarded, known as an incredibly consistent and reliable stringer, plus simple to use. Oh, and a version of it is still in production today, and that machine retails for $1399.00 (Prince Neos 1000).
The online sources and forum threads about this machine almost all agreed that anywhere below $350 was a good deal for the machine, provided it was in good condition and had all the parts.
I had looked into stringing machines in the past, mostly newer drop-weight machines. Those are smaller table-top machines, but still retail for a few hundred dollars new. They're generally less accurate than crank or electronic tension machines, but aren't over a thousand dollars.
I had a couple problems when considering purchasing this machine. I have never strung a racket before, and didn't actually know how to tell if the machine worked or even had all the pieces.
The owner, however, had used this machine for many years, strung professionally, and definitely showed me that it was in proper working condition when I arrived to check out the machine. They also were quite generous and gave me all of their string and grips.
And it was a lot of string.

This picture doesn't quite show the scale of the amount of string though.

I'm glad I held off on an order of synthetic gut until I had actually purchased the machine. Definitely don't need to buy any string anytime soon.
I'm very happy with the machine. It's incredibly simple, but incredibly good at stringing rackets. I strung my first racket using YouTube tutorials and am looking forward to stringing many more!
Hanbok-inspired skirt
This weekend I decided I actually did want to hand-sew something, and I wanted something hanbok-like I could wear in public a bit easier, so I took a 1.5 yard piece of fabric, and turned it into a chima-inspired skirt:
 |
| Tied with an otkorum! |
The pattern I used is exactly the same one as the Folkwear 141 pattern, but obviously much shorter, and without the shoulder straps.
I made the skirt from my 1.5 yard cut of 44-inch wide fabric. The waistband and ties are made from remnants of a sheet I used to back a quilt.
For the 1.5 yard piece -- I cut it in half so I had two 22 x 54 inch pieces of fabric. I cut one of those in half to get two 22 x 27 inch pieces, and cut five inches off the other to get a 22 x 49 inch piece.
Those three pieces were seamed together (longest piece in the middle), hemmed, and then pleated along the top. The pleats took quite some time. There was one pleat per inch, or almost 100 pleats across the top of the skirt. Getting them even and nice-looking was by far the most challenging part of this.
After things were pleated to perfection (not perfection, actually -- more like "okay, I can live with this"), I stitched the waistband on. Attached the ties, slip-stitched the waistband down to the inside of the skirt, and then it was done!
"Wait a second!", you may be thinking. "Didn't you just make a rectangle? You didn't seam up the back at all!"
Well, you would be correct if you were thinking this.
Here's what my skirt/mini chima looks like off a person (yes, that's my shower curtain I'm using as a backdrop -- don't worry about it).

I really like how it turned out, and how re-sizeable it is. I can tie it tighter or looser, depending on how high I want to wear it (or my current weight, ha!).
I did want to add pockets, but I didn't want to put them in at non-seams. The way the panels go on, the seams are actually somewhat on the back. I did do some math to get the seams to be more pocket-placement friendly, but didn't have enough fabric to cut panels of the right sizes. I would have needed an extra half yard to get the seams in the right place.
Singer 201-2: where the cabinet came from (hint: another Singer!)
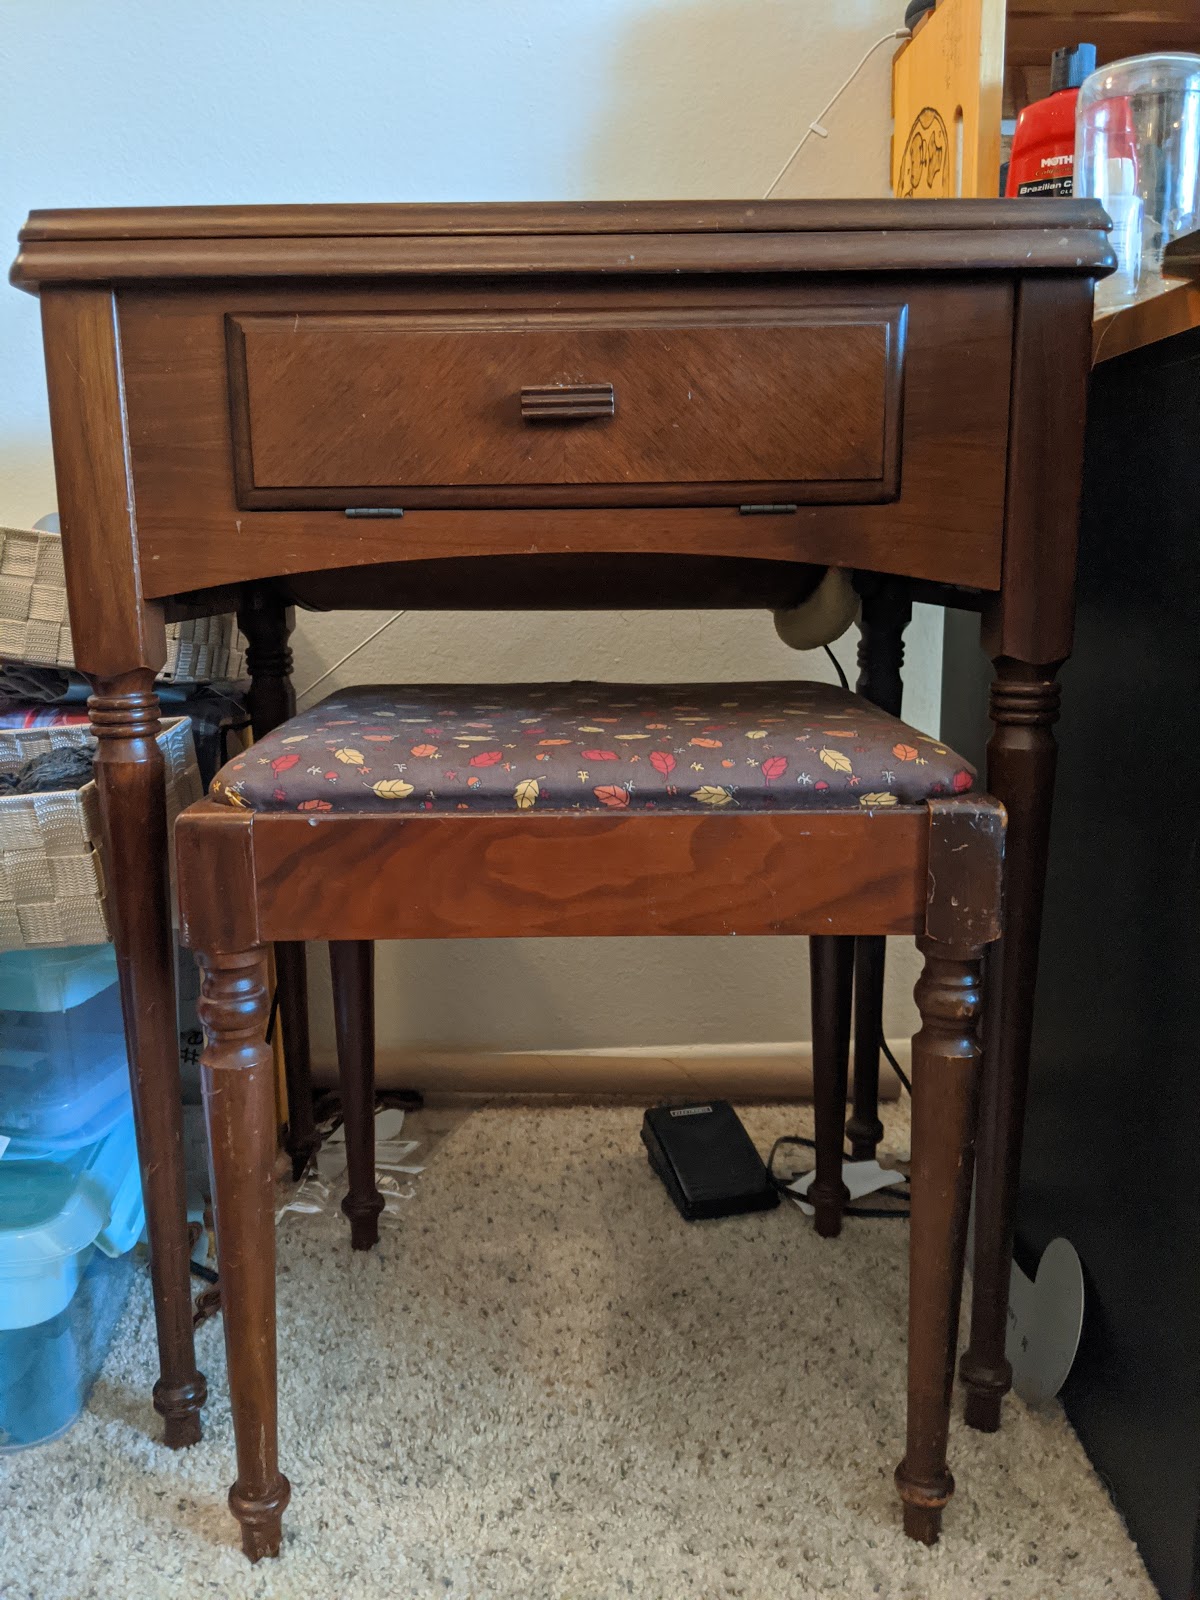 |
| Just a regular desk and stool... Right? |
The cabinets weren't made for a single model specifically, rather each cabinet had a range of machines it could fit inside. Mine didn't come in a cabinet, so I wanted to buy one. The cabinets are a good place to store the sewing machines, and also provide a larger flat surface for sewing, since the cabinet ensures the machine's bed is level with the table.
 |
| Surprise sewing machine! |
I was looking through all four of my local thrift stores almost weekly, plus scouring Craigslist and Facebook Free/For Sale, plus looking through garage sales. I found a couple cabinets that were in pretty meh condition for a pretty "oh wow" price (not in a good way) and passed them up.
Then I found a fairly inconspicuous advertisement on Craigslist. The way the advertisement was written, I guessed whoever selling it had no idea what they had.
It had a picture of two pairs of pinking shears, scissors, a buttonholer... plus an immaculate-looking cabinet with a Singer in it. I hadn't really been in the market for a buttonholer, but wouldn't pass up the opportunity to get one (especially at $30 for everything!).
When I arrived to buy it my suspicion was confirmed. The house was in a mobile home community with mostly older residents, and it looked like the house was being gutted so it could be sold. I'm guessing the previous owner passed away and their children were getting things in order.
Whoever the previous owner was took very good care of their possessions though. I say this because though everything was well-used, the only thing missing was one of the buttonholer cams. The thumb screw was still there though, and that's usually the piece that goes missing! The original manual is in great shape as well.
I'm thankful to have found all this and am trying to put it all to good use.
 |
| Feet, buttonholer, cams, shears, scissors, manual |

The 15-91 is not in as great shape as my 201-2 -- the wiring is a lot more suspect and I haven't plugged it in. A great weekend project would be to re-wire the entire machine, as I've got all the pieces and it's fairly simple to do. It's sitting in a display cabinet in my dining room till I can get it up and running.
Singer 201-2: sewing on a machine older than my parents
But as I dug deeper into reviews, I kept seeing things like "this machine broke after x months of use, and it can't be repaired since it's completely plastic on the inside". (Plastic consumption/its widespread use is a whole 'nother issue).
I couldn't justify spending over a hundred dollars on a chunk of plastic that would break and become unrepairable
So I decided to look into more durable machines that were still in my price range, namely vintage Singer machines. I knew that the vintage ones were all metal (most are cast-iron, very heavy!) and figured they'd be relatively simple to repair since they were relatively simple machines. The vast majority are straight stitch only! Some don't even go backwards!
 |
| Here's the one I got! After a thorough servicing/wipe-down. |
But there were a few reasons I picked this one:
1) No pitting/huge rust spots (even on the bottom). Only the chrome surfaces had some very superficial rust.
2) The wiring seemed to be in good condition.
3) Electric, potted motor! I didn't want a treadle or hand-turned machine (though... I kind of want a hand-turn one just for the novelty now...)
4) Large throat space!
5) The handwheel turned smoothly, and there weren't any catches/clicks/grinding.
6) It was 35 dollars.
I took it home and used this guide to identify it.
This serial number look-up confirmed it was a 201 model, made around January 1950.
1950! How crazy is that!
 |
| Sounds kind of rough... |
He showed me how to thread it, told me to not use upholstery-weight thread (oops), especially not as the top thread combined with a regular-weight cotton thread on the bottom (double oops), and told me I made a good purchase, since the 201-2 is a very good machine, and mine was in fairly good condition. His visit cost about $120, or far more than the machine cost! But it was definitely worth it.
Features of the Singer 201-2:
- Adjustable stitch width. Six to thirty stitches per inch.
- Forward and reverse!
- Feed dogs can be lowered.
- Can be used as a workout aid (not really, please use actual dumbbells).
I purchased this machine almost a year ago. Since then, I've made clothing, quilts, pillow covers, and a variety of other things on it. It's still stitching beautifully.
I've also purchased a cabinet, buttonholer, zigzag attachment, and LED bulb for it. I've definitely exceeded my initial budget of $100-150, but I don't have any regrets.
 |
| Where my 201-2 currently lives, a wonderful Singer cabinet! |
Singer 201-2: Buttonholer attachment
Well, there actually is!
You'll need a very specific attachment though. (How I got mine).

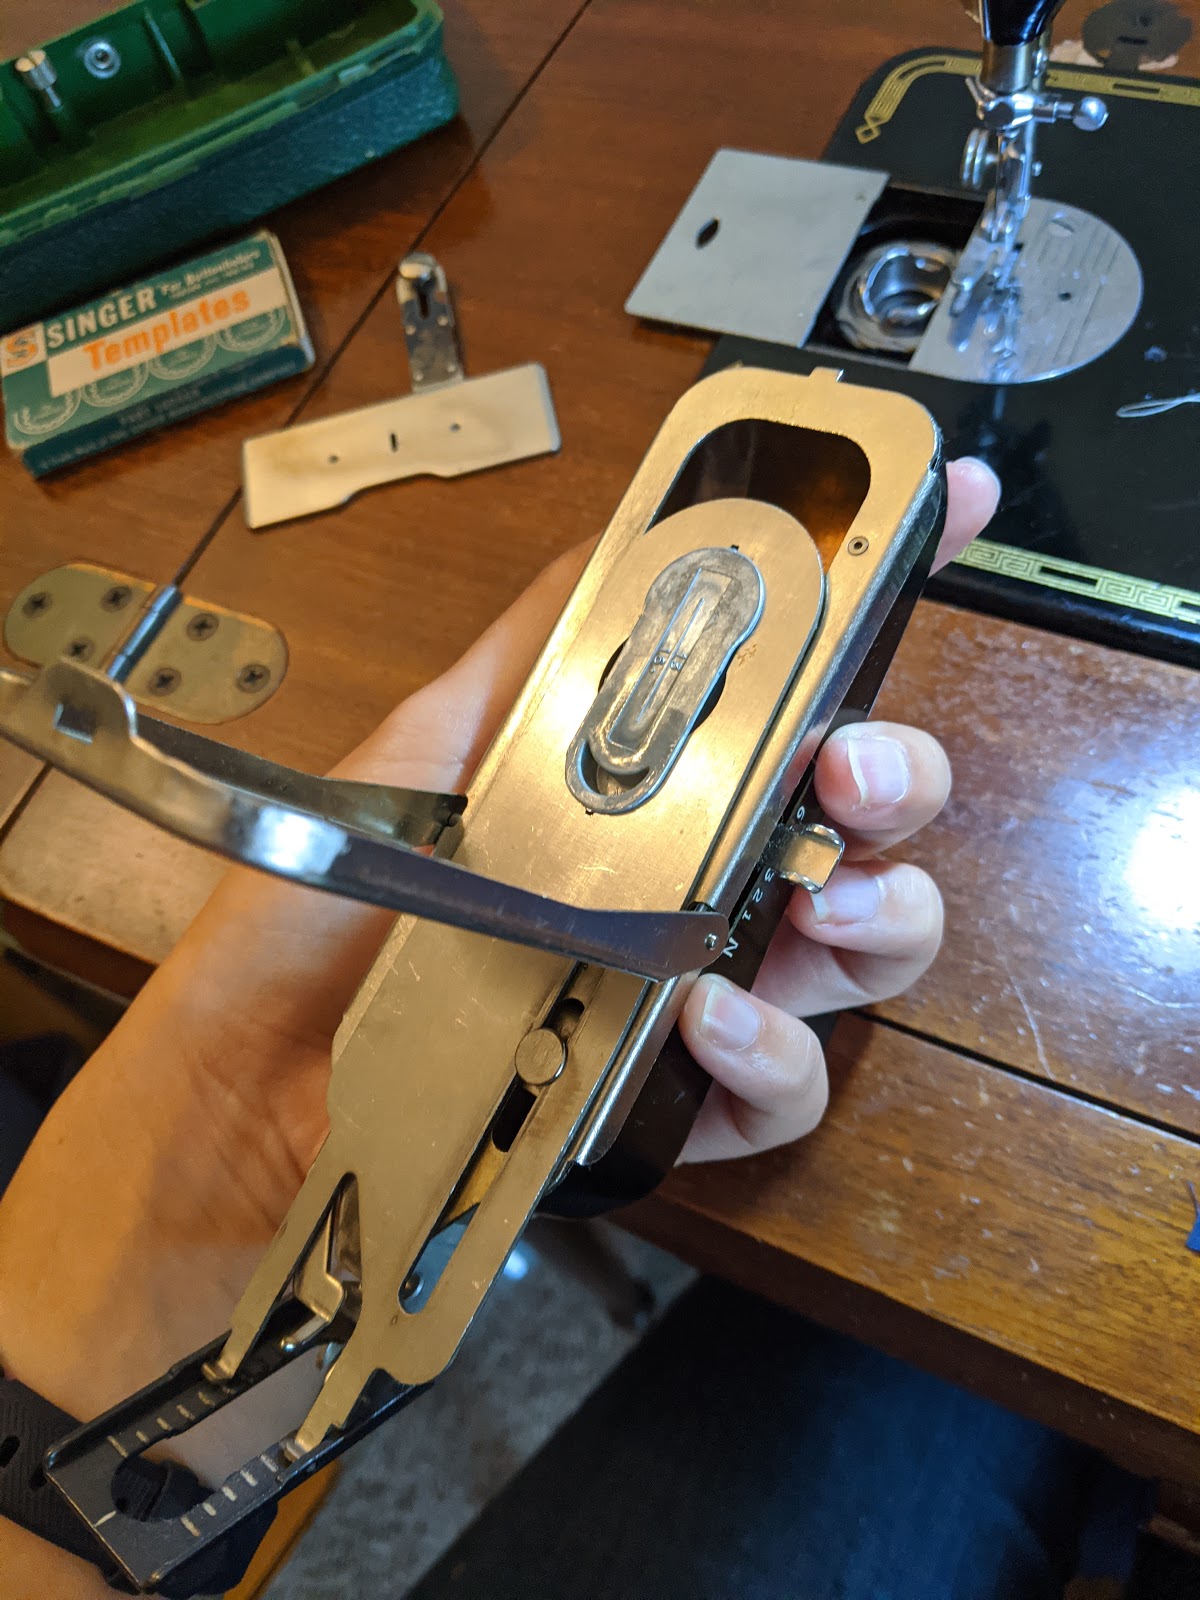

Here's how the buttonholer is attached to the machine. There's a lever arm that rests on the needle bar, plus it's screwed in the same way as any other foot would be.
Crucially, you'll also need a feed dogs cover plate screwed on, with the needle hole still open. If you don't have one, the fabric/threads will catch and pull things out of shape. If you cover the needle hole, well, you'll have a very broken needle and messed up machine timing!
I think dropping your feed dogs is sufficient as well, but you don't need to do both!

In action!

I've found that two to three layers of stitching make a good, solid button hole.
After the button hole is made, you remove the fabric from the machine, snip the threads, and use a seam ripper or scissors to very carefully clip the button hole open.
Some slow-motion so you can see the zig-zagging:

Singer 201-2: zig-zag attachment
With a specially-made attachment!

The templates are easier to swap out than the ones in my buttonholer:

It does attach very similarly to a buttonholer, ie there's an arm that rests on the needle bar, and it screws in like any other foot does.

It's a lot quieter than my buttonholer, I think. Here's all the designs:
 |
| Add-on templates |
 |
| Original templates |
Zig-zagger in slow motion:

And finally, you can swap back and forth between zig-zag and straight stitching without removing the attachment! If you push this lever arm forward, you can straight stitch. If you push it back, you'll be zig-zagging.

Knot bag, present for Mom!
 |
| The completed knot bag. |
My mom gave me a lot of quilting fabric a while ago. She had a huge box full of fabric that she wasn't using, and knew I'd be interested! And she also mentioned, quite a while ago, that she liked knot bags.
I asked her what her favorite color was, to which she replied "blue teal is a good default. What am I getting?". She was definitely on to me...
There were a couple fabrics in the box that were blue or teal-ish, that also happened to go together. I decided to add a couple pockets to the bag out of the scraps from cutting the bag pieces from the fabric.
 |
| The "inside" of the bag. |
 |
| The "outside" of the bag. |
I hand sewed the bag, and finished the edges with palestrina stitch. The palestrina edging took the longest amount of time. But I wanted something sturdy and reversible, since the bag is also reversible.
 |
| Detail of the palestrina edging. |
"A warm hug": also known as "hand quilting takes forever"
I've always enjoyed making things -- I started knitting during elementary school, crochet shortly after. Sewing and embroidery followed soon after, and other creative explorations into woodworking, origami, and weaving.
Lately I've found I really enjoy hand-sewing... things. Like clothing, bags, or quilts.
I decided, in early November 2019, that I wanted to make a quilt for my parents for Christmas. And I did some quick math and decided that I could possibly, probably, hand quilt it in time for Christmas.
So I did.
 |
| Finished quilt! |
Washing, ironing, and pairing the color blocks took about a day. Cutting and constructing the final blocks took another day. Creating the quilt top took maybe a couple of hours. Making the quilt sandwich neatly (something I still struggle with) took about an hour, since I safety-pinned everything.
But the quilting... each square took about 10-20 minutes to quilt. I did get faster as time went on. I quilted squares, rotated 45 degrees so they're more visible on the fabric.
 |
| Quilting in process. |
I quilted at home, quilted in my hotel room while I traveled for work, and then quilted at home some more. I quilted during lunch breaks at work, during some meetings (shh, don't tell the managers!), during hangouts with friends...
I finished quilting on December 20th. Slightly behind schedule.
 |
| Done quilting -- now on to the binding! |
 |
| Hand-binding |
I finished the entire quilt on the 22nd. I washed it that night, and let it hang to dry. It was dry on the evening of the 23rd, which was great, because it needed to be wrapped and driven to my parent's place for Christmas!
They enjoyed it, and my dad was especially impressed by the time I had put into it.
After I left for home, my mom sent me a picture of Jackie the dog enjoying the quilt:
 |
| Jackie the dog |
Thrifting for yarn, but in sweater form!
I found four pieces of clothing (two cardigans, one sweater, and a dress) that fit my criteria. I was hoping to find more, but four turned out to be quite enough!
You see, yarn is quite expensive. I knit quite a bit, and that requires a sizeable stash of yarn. When the amount of quality yarn it takes to knit a hat hits about $25, the amount of yarn I would need to make a shawl or sweater makes me uneasy (hint: easily over $100).
So I thrifted some clothes and unraveled them. I pulled each item apart at the seams, wound each resulting piece into balls, wound those balls into hanks, washed the hanks (thrift stores are not known for their cleanliness), then wound the hanks back into balls.
Doesn't sound like too much work, right? I was eager to start, envisioning a few hours' work to produce lots of cheap yarn to play with.
It's been about a week, and I've so far only processed three of the four items of clothing. I didn't make great choices picking these items. The dress was made of super-fine yarn, but it was a beautiful orange, and 100% alpaca! For $6. I couldn't say no...
But unraveling it was a nightmare. It had a few rips and tears that were clumsily patched, and the yarn tangled easily. I spent more than half my time picking out knots and joining broken threads, rather than actually unraveling it.
And one of the cardigans was made of a one-ply wool blend that was already pilling before I bought it. That yarn quite enjoyed breaking and producing vast amounts of fuzz.
But I think it's worth it. I've unraveled, washed, and balled up about 3,500 yards so far. And the total cost has been less than $20, not counting the hours I voluntarily dedicated to this task.
Pictures and general process for the dress below (sort of skips some steps in the middle!):
 |
| Original dress. 100% alpaca! |
 |
| All unraveled, wound into hanks, and soaking. |
 |
| Hanging up to dry. Note the tiny, tiny, center skein. I think it was a cuff. |
 |
| After drying, a clean hank of yarn! |
 |
| The fruits of my labor, 207 grams/1725 yards of beautiful alpaca wool. |
The birth of SpongeGuyParkFeld
My team's project (well, we're one big group but split into two teams for easier management) is natural-language processing. Specifically, sentiment analysis of transcripts of TV shows. The goal is to map character relationships, vocabulary shifts over time or due to new writers, and vocabulary richness based on target audiences. And stuff like that. We're planning on refining the goals more as we progress in the project, but that's the general direction.
The shows we have chosen to analyze are Spongebob, Family Guy, South Park, and Seinfeld. We sort of mashed all the names together to create a single word to represent our project. Hence, the birth of SpongeGuyParkFeld!
It's a memorable name, and will definitely raise a few eyebrows. Hopefully in a good way.
I'm excited to do some 'real' computational linguistics. I've used Python and R before, as well as Beautiful Soup to scrape things. But not in this capacity, where's it's mostly self-directed and open-ended. And automating the scraping of an entire website rather than a single page will probably require some stuff I've never done before.
Another thing that's new to me is using git with multiple people. I have my own GitHub, use it semi-regularly, and I'm comfortable with managing it with Sourcetree. But I also mess up commits and organization. So I hope that I won't mess up my entire group's project somehow.
I think I'll have to learn as I go, and ask a lot of questions. Only two people in my group have used GitHub with multiple contributors before though, so I'll be learning along with everyone else. Hopefully they don't mess it up either!
The first part of the project is just going to be webscraping and cleaning datasets. Transcripts of the target shows are the best ones we can find, but there's still some problems and inconsistencies with them.
I don't know why I didn't join this club earlier, honestly. It's a great experience and hand-ons experience. The club is also a great way to network with people from more technical majors and different interests. My group has a statistics major, two physics majors, a couple computer science people, and me, a linguistics major.
I'm excited to start working on this project. Every aspect of it will strengthen my skills and challenge me. Especially the teamwork aspect of it. People are sometimes more frustrating than code.