
Singer 201-2: where the cabinet came from (hint: another Singer!)
My 201-2 currently lives in a sewing machine cabinet. These cabinets were made to look like regular furniture, but actually house a full sewing machine.
The cabinets weren't made for a single model specifically, rather each cabinet had a range of machines it could fit inside. Mine didn't come in a cabinet, so I wanted to buy one. The cabinets are a good place to store the sewing machines, and also provide a larger flat surface for sewing, since the cabinet ensures the machine's bed is level with the table.
The cabinet took me a long time to find, because I was being kind of picky.
I was looking through all four of my local thrift stores almost weekly, plus scouring Craigslist and Facebook Free/For Sale, plus looking through garage sales. I found a couple cabinets that were in pretty meh condition for a pretty "oh wow" price (not in a good way) and passed them up.
Then I found a fairly inconspicuous advertisement on Craigslist. The way the advertisement was written, I guessed whoever selling it had no idea what they had.
It had a picture of two pairs of pinking shears, scissors, a buttonholer... plus an immaculate-looking cabinet with a Singer in it. I hadn't really been in the market for a buttonholer, but wouldn't pass up the opportunity to get one (especially at $30 for everything!).
When I arrived to buy it my suspicion was confirmed. The house was in a mobile home community with mostly older residents, and it looked like the house was being gutted so it could be sold. I'm guessing the previous owner passed away and their children were getting things in order.
Whoever the previous owner was took very good care of their possessions though. I say this because though everything was well-used, the only thing missing was one of the buttonholer cams. The thumb screw was still there though, and that's usually the piece that goes missing! The original manual is in great shape as well.
I'm thankful to have found all this and am trying to put it all to good use.
The original 15-91 in its original cabinet:
 It's easy to swap machines out of cabinets -- the only tricky part is how heavy they are. Ideally you have a second person hold the machine while you screw/unscrew things, but it's doable with one person!
The 15-91 is not in as great shape as my 201-2 -- the wiring is a lot more suspect and I haven't plugged it in. A great weekend project would be to re-wire the entire machine, as I've got all the pieces and it's fairly simple to do. It's sitting in a display cabinet in my dining room till I can get it up and running.
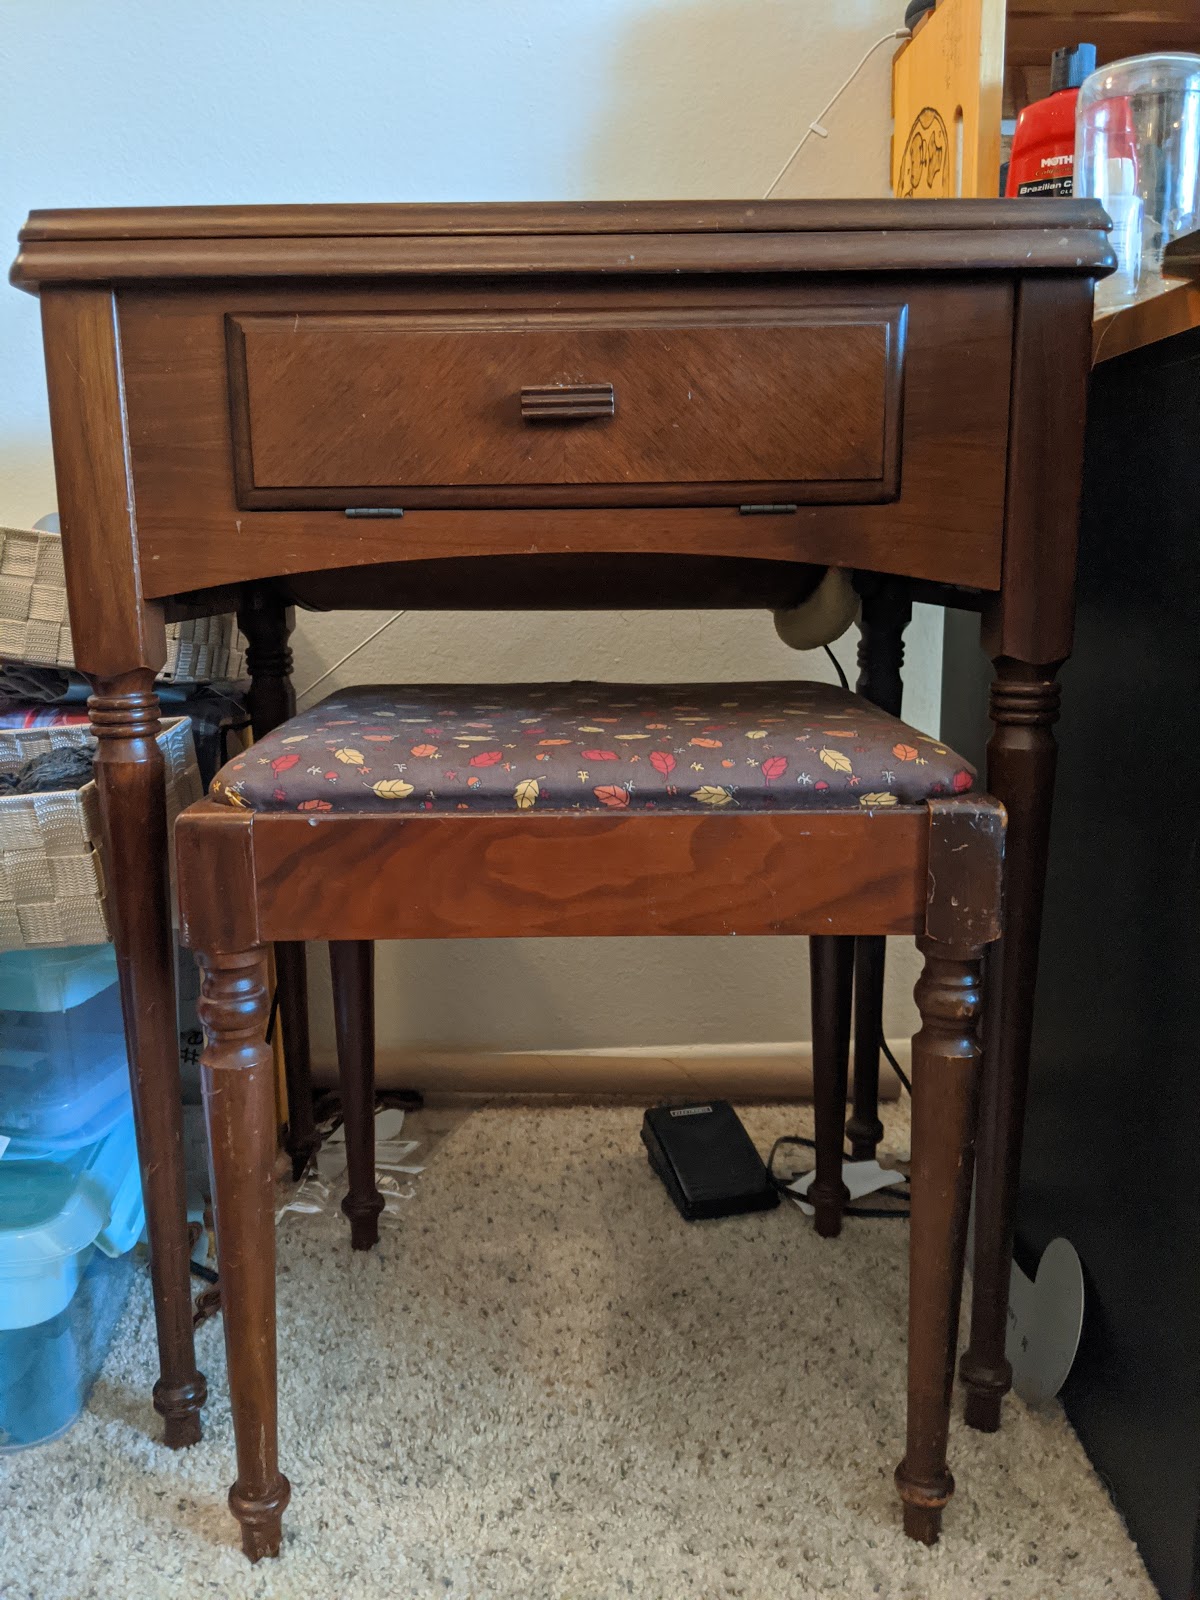 |
| Just a regular desk and stool... Right? |
The cabinets weren't made for a single model specifically, rather each cabinet had a range of machines it could fit inside. Mine didn't come in a cabinet, so I wanted to buy one. The cabinets are a good place to store the sewing machines, and also provide a larger flat surface for sewing, since the cabinet ensures the machine's bed is level with the table.
 |
| Surprise sewing machine! |
I was looking through all four of my local thrift stores almost weekly, plus scouring Craigslist and Facebook Free/For Sale, plus looking through garage sales. I found a couple cabinets that were in pretty meh condition for a pretty "oh wow" price (not in a good way) and passed them up.
Then I found a fairly inconspicuous advertisement on Craigslist. The way the advertisement was written, I guessed whoever selling it had no idea what they had.
It had a picture of two pairs of pinking shears, scissors, a buttonholer... plus an immaculate-looking cabinet with a Singer in it. I hadn't really been in the market for a buttonholer, but wouldn't pass up the opportunity to get one (especially at $30 for everything!).
When I arrived to buy it my suspicion was confirmed. The house was in a mobile home community with mostly older residents, and it looked like the house was being gutted so it could be sold. I'm guessing the previous owner passed away and their children were getting things in order.
Whoever the previous owner was took very good care of their possessions though. I say this because though everything was well-used, the only thing missing was one of the buttonholer cams. The thumb screw was still there though, and that's usually the piece that goes missing! The original manual is in great shape as well.
I'm thankful to have found all this and am trying to put it all to good use.
 |
| Feet, buttonholer, cams, shears, scissors, manual |

The 15-91 is not in as great shape as my 201-2 -- the wiring is a lot more suspect and I haven't plugged it in. A great weekend project would be to re-wire the entire machine, as I've got all the pieces and it's fairly simple to do. It's sitting in a display cabinet in my dining room till I can get it up and running.
Singer 201-2: sewing on a machine older than my parents
I am trying to cultivate a "buy-it-for-life" mindset. When I was looking into sewing machines, I found plenty of machines that seemed to be in my price range ($100-150) with decent reviews. I wasn't expecting a powerhouse of a machine, but if I was spending a hundred dollars on it, I wanted it to last a while.
But as I dug deeper into reviews, I kept seeing things like "this machine broke after x months of use, and it can't be repaired since it's completely plastic on the inside". (Plastic consumption/its widespread use is a whole 'nother issue).
I couldn't justify spending over a hundred dollars on a chunk of plastic that would break and become unrepairable
So I decided to look into more durable machines that were still in my price range, namely vintage Singer machines. I knew that the vintage ones were all metal (most are cast-iron, very heavy!) and figured they'd be relatively simple to repair since they were relatively simple machines. The vast majority are straight stitch only! Some don't even go backwards!
I actually didn't know if it worked or not, because the power cord was nowhere to be seen at the time or purchase... I ordered a generic power cord off Amazon later.
But there were a few reasons I picked this one:
1) No pitting/huge rust spots (even on the bottom). Only the chrome surfaces had some very superficial rust.
2) The wiring seemed to be in good condition.
3) Electric, potted motor! I didn't want a treadle or hand-turned machine (though... I kind of want a hand-turn one just for the novelty now...)
4) Large throat space!
5) The handwheel turned smoothly, and there weren't any catches/clicks/grinding.
6) It was 35 dollars.
I took it home and used this guide to identify it.
This serial number look-up confirmed it was a 201 model, made around January 1950.
1950! How crazy is that!
He showed me how to thread it, told me to not use upholstery-weight thread (oops), especially not as the top thread combined with a regular-weight cotton thread on the bottom (double oops), and told me I made a good purchase, since the 201-2 is a very good machine, and mine was in fairly good condition. His visit cost about $120, or far more than the machine cost! But it was definitely worth it.
Features of the Singer 201-2:
I purchased this machine almost a year ago. Since then, I've made clothing, quilts, pillow covers, and a variety of other things on it. It's still stitching beautifully.
I've also purchased a cabinet, buttonholer, zigzag attachment, and LED bulb for it. I've definitely exceeded my initial budget of $100-150, but I don't have any regrets.
But as I dug deeper into reviews, I kept seeing things like "this machine broke after x months of use, and it can't be repaired since it's completely plastic on the inside". (Plastic consumption/its widespread use is a whole 'nother issue).
I couldn't justify spending over a hundred dollars on a chunk of plastic that would break and become unrepairable
So I decided to look into more durable machines that were still in my price range, namely vintage Singer machines. I knew that the vintage ones were all metal (most are cast-iron, very heavy!) and figured they'd be relatively simple to repair since they were relatively simple machines. The vast majority are straight stitch only! Some don't even go backwards!
I went to thrift stores until I found one I really, really liked. I had seen a few others but they were too small (I wanted one with a larger throat), far too expensive, or in absolutely terrible condition.
 |
| Here's the one I got! After a thorough servicing/wipe-down. |
But there were a few reasons I picked this one:
1) No pitting/huge rust spots (even on the bottom). Only the chrome surfaces had some very superficial rust.
2) The wiring seemed to be in good condition.
3) Electric, potted motor! I didn't want a treadle or hand-turned machine (though... I kind of want a hand-turn one just for the novelty now...)
4) Large throat space!
5) The handwheel turned smoothly, and there weren't any catches/clicks/grinding.
6) It was 35 dollars.
I took it home and used this guide to identify it.
This serial number look-up confirmed it was a 201 model, made around January 1950.
1950! How crazy is that!
 |
| Sounds kind of rough... |
I inspected the wiring and deemed it safe enough to plug in and not cause an electrical fire. It didn't catch fire, but it did not sound like it was ready to sew anything any time soon.
Thankfully there's a local business, run by a very sweet older gentleman, who is continuing his father's business. He came out to my apartment and did a very thorough clean-up, timing adjustment, basic "how-to", plus a history lesson.
He showed me how to thread it, told me to not use upholstery-weight thread (oops), especially not as the top thread combined with a regular-weight cotton thread on the bottom (double oops), and told me I made a good purchase, since the 201-2 is a very good machine, and mine was in fairly good condition. His visit cost about $120, or far more than the machine cost! But it was definitely worth it.
Features of the Singer 201-2:
- Adjustable stitch width. Six to thirty stitches per inch.
- Forward and reverse!
- Feed dogs can be lowered.
- Can be used as a workout aid (not really, please use actual dumbbells).
I purchased this machine almost a year ago. Since then, I've made clothing, quilts, pillow covers, and a variety of other things on it. It's still stitching beautifully.
I've also purchased a cabinet, buttonholer, zigzag attachment, and LED bulb for it. I've definitely exceeded my initial budget of $100-150, but I don't have any regrets.
 |
| Where my 201-2 currently lives, a wonderful Singer cabinet! |
Singer 201-2: Buttonholer attachment
Button holes can be done by hand. But... you might make the button hole too small or too big, and there's probably lots of them to do! If only there was a quick way to do button holes on a straight-stitch only machine...
Well, there actually is!
You'll need a very specific attachment though. (How I got mine).
 The buttonholer is a marvelous thing. It's very loud (clack-clack-clack) but produces amazingly consistent button holes. And it manages to do it on a straight-stitch only machine!
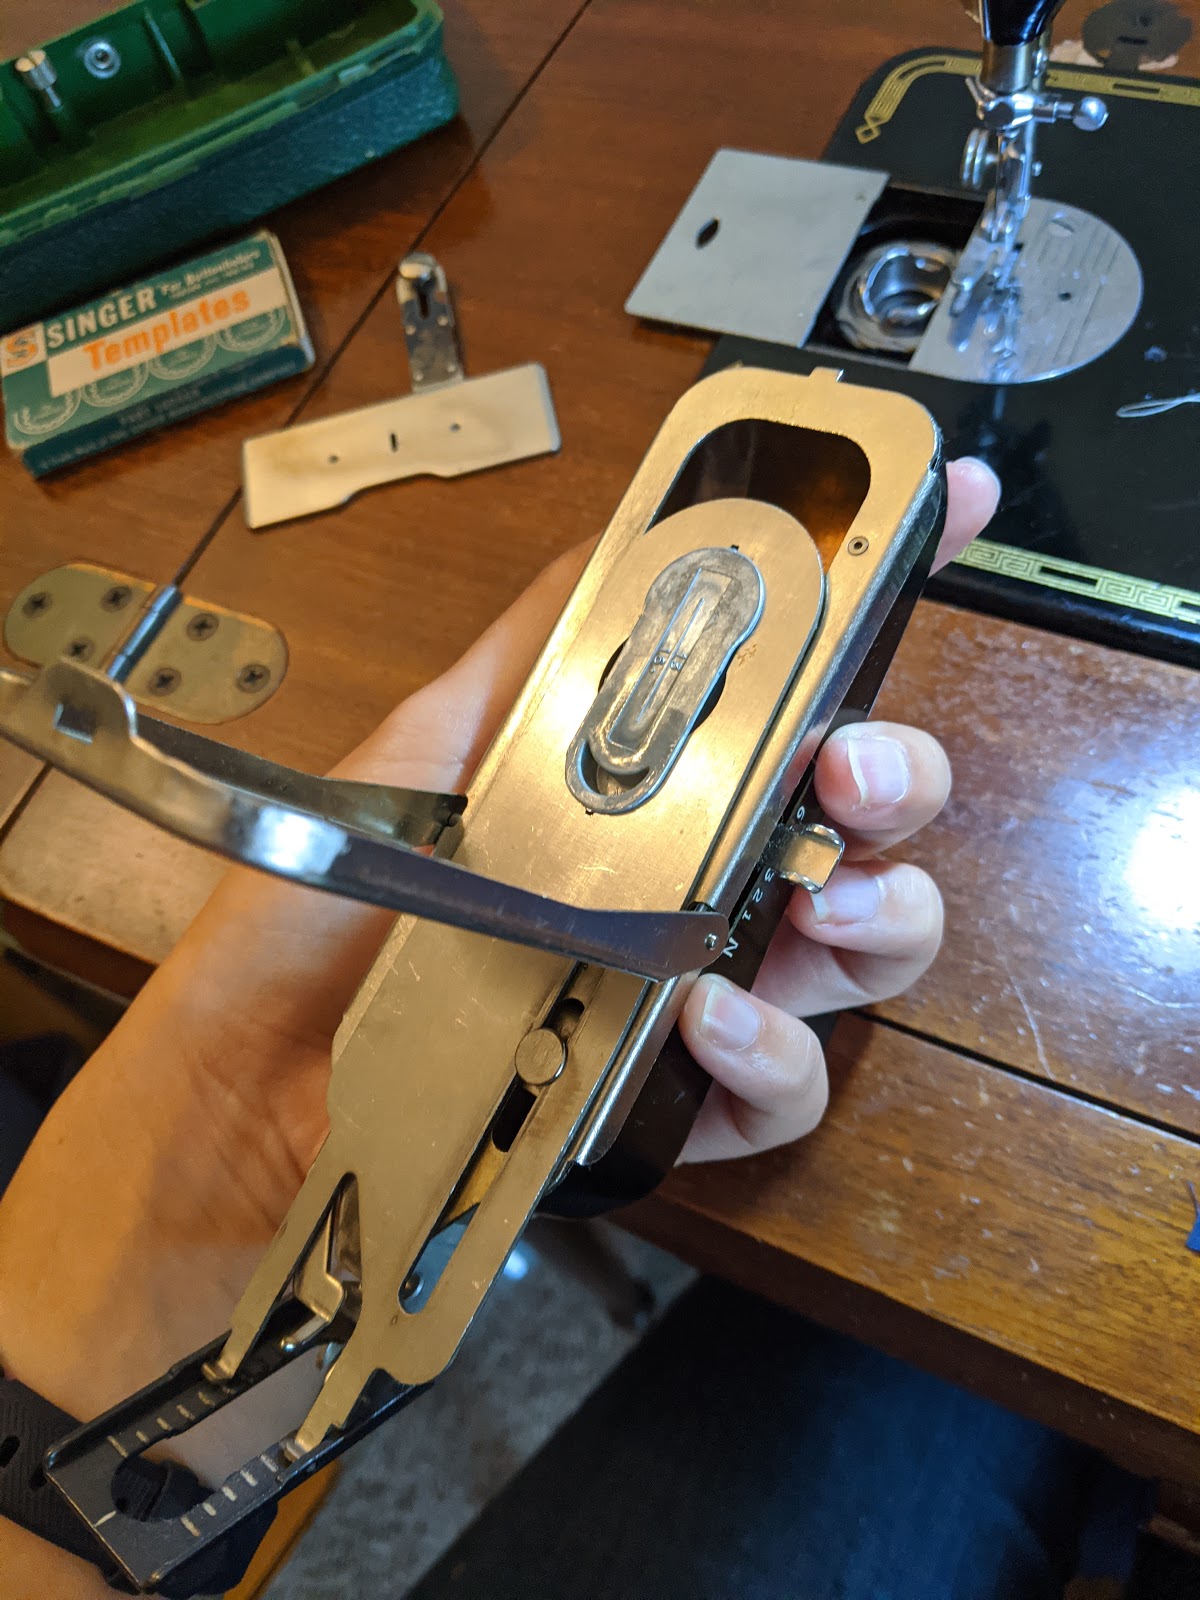
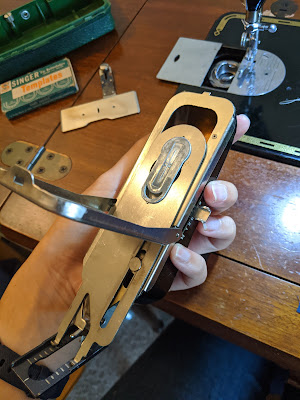 Here's the underside of the buttonholer, with the bottom popped off. This is how you swap out cams.

Here's how the buttonholer is attached to the machine. There's a lever arm that rests on the needle bar, plus it's screwed in the same way as any other foot would be.
Crucially, you'll also need a feed dogs cover plate screwed on, with the needle hole still open. If you don't have one, the fabric/threads will catch and pull things out of shape. If you cover the needle hole, well, you'll have a very broken needle and messed up machine timing!
I think dropping your feed dogs is sufficient as well, but you don't need to do both!

In action!

I've found that two to three layers of stitching make a good, solid button hole.
After the button hole is made, you remove the fabric from the machine, snip the threads, and use a seam ripper or scissors to very carefully clip the button hole open.
Some slow-motion so you can see the zig-zagging:

Well, there actually is!
You'll need a very specific attachment though. (How I got mine).


Here's how the buttonholer is attached to the machine. There's a lever arm that rests on the needle bar, plus it's screwed in the same way as any other foot would be.
Crucially, you'll also need a feed dogs cover plate screwed on, with the needle hole still open. If you don't have one, the fabric/threads will catch and pull things out of shape. If you cover the needle hole, well, you'll have a very broken needle and messed up machine timing!
I think dropping your feed dogs is sufficient as well, but you don't need to do both!

In action!
I've found that two to three layers of stitching make a good, solid button hole.
After the button hole is made, you remove the fabric from the machine, snip the threads, and use a seam ripper or scissors to very carefully clip the button hole open.
Some slow-motion so you can see the zig-zagging:
Singer 201-2: zig-zag attachment
How does one sew a zig-zag on a straight-stitch only machine (ex, my Singer 201-2)?
With a specially-made attachment!
 I purchased mine off of Ebay, since I couldn't find anything locally (these are not very common -- not extraordinarily rare, but I just haven't seen these locally), plus this one was in great condition. No missing pieces, boxes all there, original instructions too!
The templates are easier to swap out than the ones in my buttonholer:
 The top pops open! The buttonholer has to be removed to swap things out. Which isn't unreasonable -- how often do you have to sew multiple sizes of button holes on the same garment?
It does attach very similarly to a buttonholer, ie there's an arm that rests on the needle bar, and it screws in like any other foot does.

It's a lot quieter than my buttonholer, I think. Here's all the designs:
The second picture has a few different stitch/bight options for the second from the left template. Rows two, three, and four of that picture are the same template, but different options!
Zig-zagger in slow motion:

And finally, you can swap back and forth between zig-zag and straight stitching without removing the attachment! If you push this lever arm forward, you can straight stitch. If you push it back, you'll be zig-zagging.

With a specially-made attachment!

The templates are easier to swap out than the ones in my buttonholer:

It does attach very similarly to a buttonholer, ie there's an arm that rests on the needle bar, and it screws in like any other foot does.

It's a lot quieter than my buttonholer, I think. Here's all the designs:
 |
| Add-on templates |
 |
| Original templates |
Zig-zagger in slow motion:
And finally, you can swap back and forth between zig-zag and straight stitching without removing the attachment! If you push this lever arm forward, you can straight stitch. If you push it back, you'll be zig-zagging.
